SchoolNotes Tutorials
Adding Images
When you are working with images and graphics in your SchoolNotes page, there is one very important thing you must remember – Be sure you have permission to use other people’s graphics. There are many websites out there that will allow you to directly link to an image on their site as long as you provide the proper information for the graphics when you use them on your page(s). However, there are many sites that require you to download these images to your computer and give them your own internet space (upload and host them on a website).
This can be done easily with an online program like Image Shack. There is a free and a subscription version of this online program and I have used the free one for a few years now. What this program does is it allows you to upload pictures from your computer onto their website to give them the “web space” needed to insert them into your SchoolNotes page(s). Just follow the directions to subscribe to this program and upload your images.
You can subscribe to this free image hosting program at http://my.imageshack.us/registration/
The alternative to this service would be using SchoolNotes as the image host. Keep in mind, any images added this way will take up space in your "My Files" section. See Adding Images Using “Files” for that method.
NOW LET’S GET STARTED WITH INSERTING IMAGES INTO YOUR SCHOOLNOTES PAGE!
In the below image, you will notice in the HTML Text Editor Tool Bar there is an icon that looks like a picture of a mountain. This icon represents the “Insert Image” tool you will use to add images and graphics to your web page(s).

Once you have clicked on this icon, the below window will pop open.
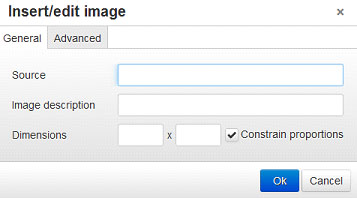
To insert the image you will need to paste the image URL into the ‘Source’ field. You can acquire the address of an image by placing your cursor over the image, right clicking and then select “Copy Image Location”. (If you are hosting the image in your SchoolNotes files simply right click on the file name and select the same, ‘Copy Image Location’.)
Feel free to add an image description. The editor will automatically import the image dimensions, you can adjust these here, or once the image has been inserted.
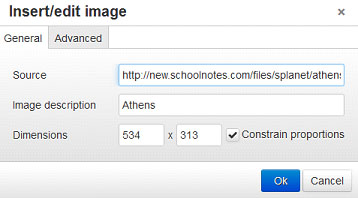
After you have added the information in for the image you are working with, it should look like the example below.
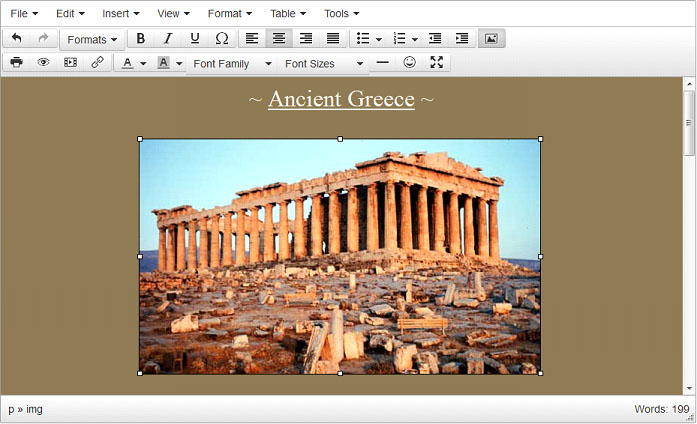
Now that all of the correct information has been entered in for your image/graphic, click the “OK” button. You should be able to see the picture you have just inserted on your page.
After the images have been inserted into your page you can resize it and/or cut and paste it to position the image any way you would like to in your page. To insert more images, just follow the same steps as above for each one.
Adding Images Using "Files"
Here is a work around for not having to use a Third Party Vendor when adding images to your SchoolNotes page. Keep in mind, when you use the images the way that I am going to show you, it will take up space in your "My Files" section. To add an image to your SchoolNotes page from your computer, you will need to do the following:
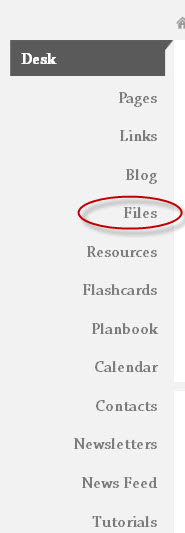
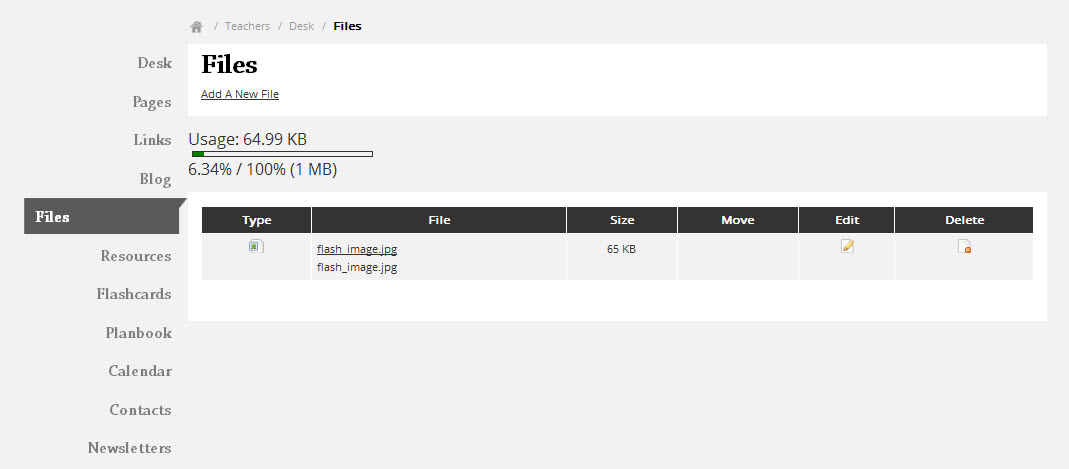
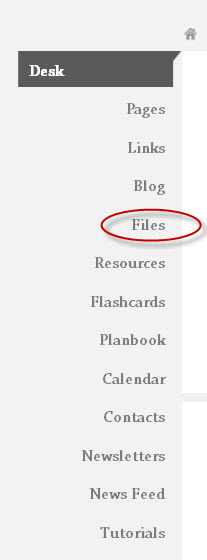
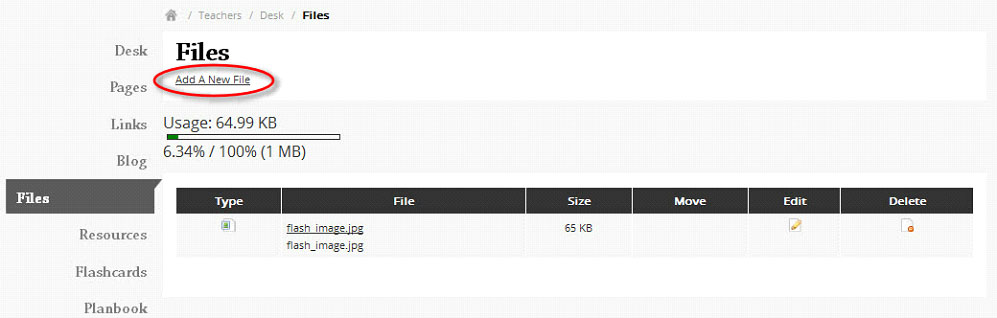
STEP 1. Click on the "Files” link in the left margin of your desk:
STEP 2. You will then be taken to the following page within your account:
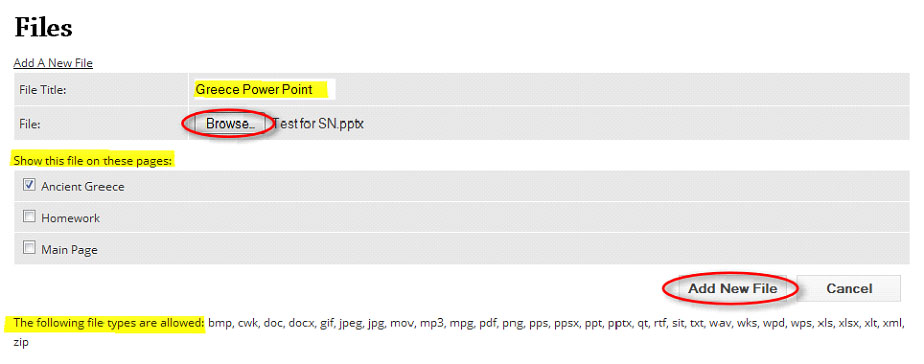
Step 3. Click on the "Add a New File" link to add your first file. Once you click on the link, additional boxes will appear for you to fill in. You will enter in a title and browse your computer documents to locate the file. Next, select the page(s) you want this file to display on and then click "Add New File" button to save your changes.
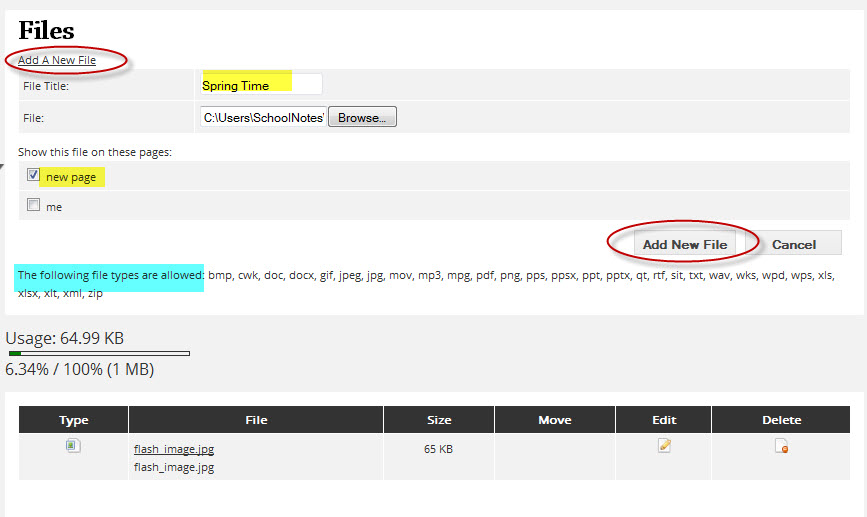
*Pay special attention to the list of files you are able to upload into your account-if you do not see it in the list, do not upload it into your page.
Once your file has been added, a list of all of your attachments will appear. By clicking on the "Edit" icon, you can make changes to the title of the document or what page(s) you want the document displayed on. Make sure to save your updates. By clicking on the "Delete" icon, you will delete the file from the page(s) it is listed on as well as from within your "Files" section.
Blogging
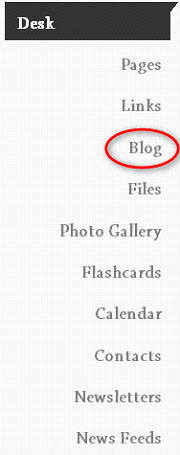
STEP 1. To create a blog entry click on “Blog” in the left bar:
STEP 2. Click on the “Add a New Blog Entry” link:

A window will appear that looks very similar to your edit window for your SchoolNotes pages.
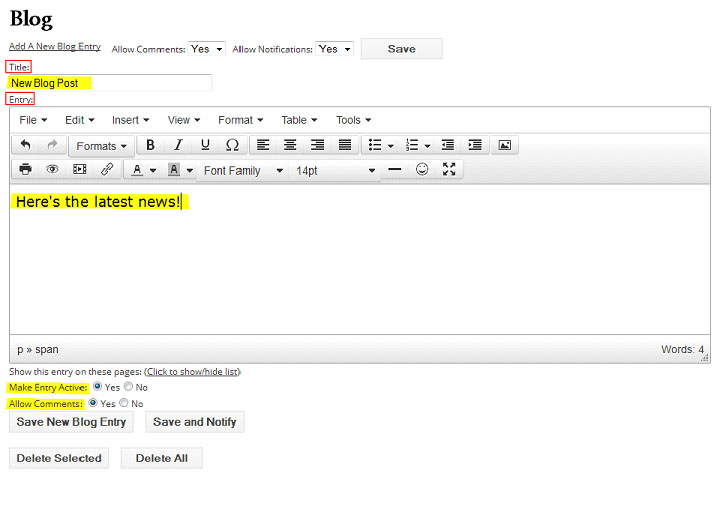
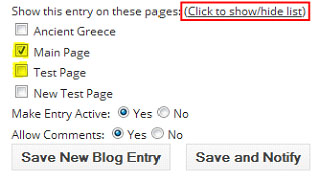
Enter a Title for your blog and add your blog content within the space provided. If you want the blog to be viewed by your parents and students you must make the blog ‘Active’. You also have the option to allow comments on your blog page. When saving your blog post you have two options, you can simply save the entry or you can click the ‘Save and Notify*’ button to send an e-mail notification to your notification list. (*Please note this will go to the notification lists of the pages you have selected this post to appear on.)
*Your blog will post to all of your SchoolNotes pages by default. To change this, click the “Click to show/hide list” link and select which pages you would like this post to appear on.
Once saved, your entry will now appear on your pages for your parents and students, as well as on your teacher desk.
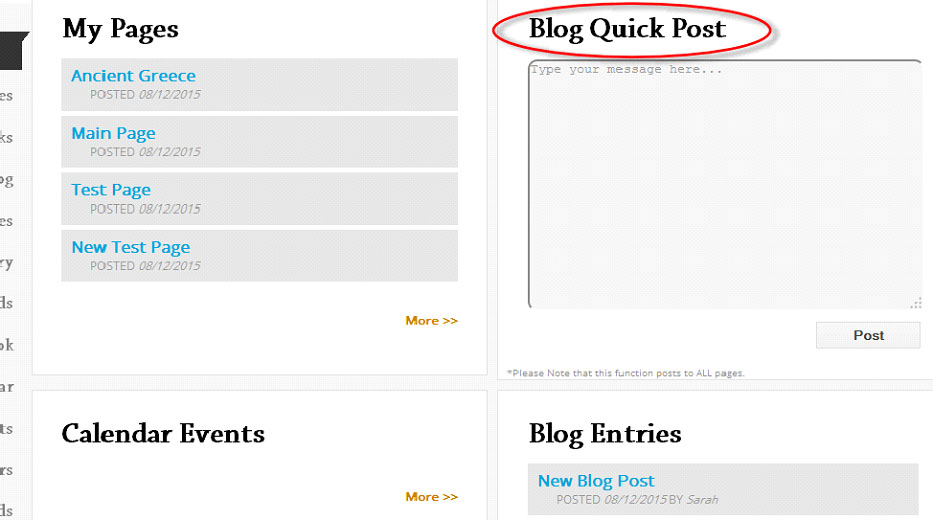
STEP 3: You can also add a “Quick Post” to your blog if you do not have the time to enter an entire blog entry. This can be done from your Desk. All you need to do is type your message in to your Quick Post box and your message will be posted to all of your SchoolNotes pages.
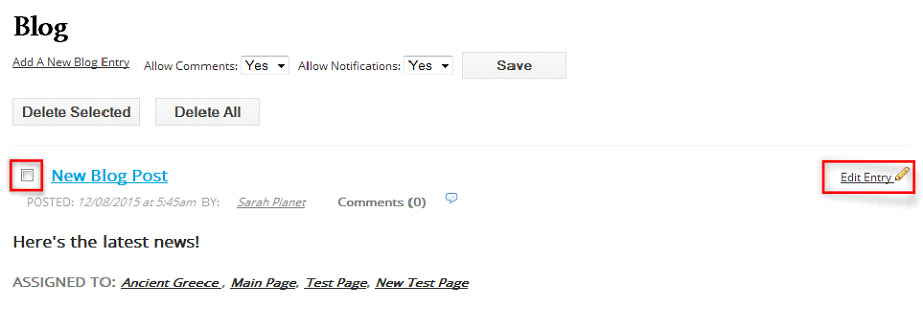
STEP 4: Once you have created your blog post you can always go back and edit it. Simply click on the “Edit Entry” icon to make changes to the entry. You can also delete any of your blog posts. To do this simply, check the box next to the post title and click ‘Delete Selected’.
Clearing Your Cache and Cookies
It may be necessary to clear your cache and cookies two or three times.
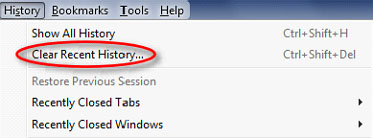
To clear your cache and cookies in Mozilla Firefox:
Click on ‘History’ in the upper left-hand side of the screen and select ‘Clear Recent History’.
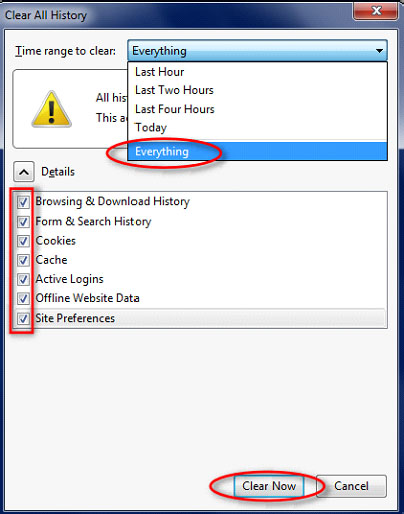
In the window that appears select your time range, to clear your entire cache, select ‘Everything’. Next select which elements of the history to clear; to clear your entire cache, select all items. Then click ‘Clear Now’.
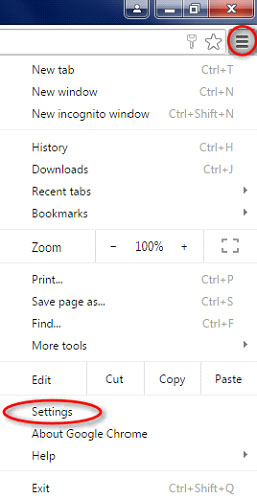
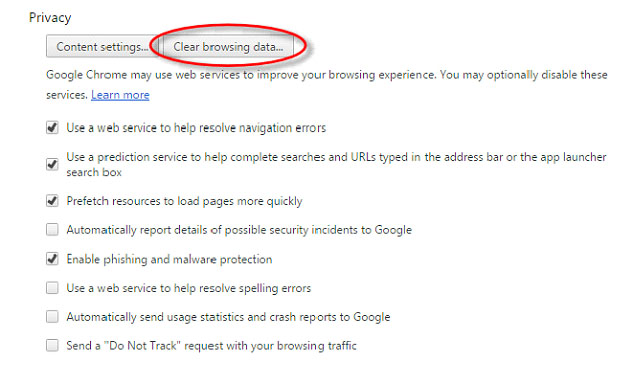
To clear your cache and cookies in Chrome:
In the upper right-hand corner click on the three horizontal bars. Select ‘Settings’.
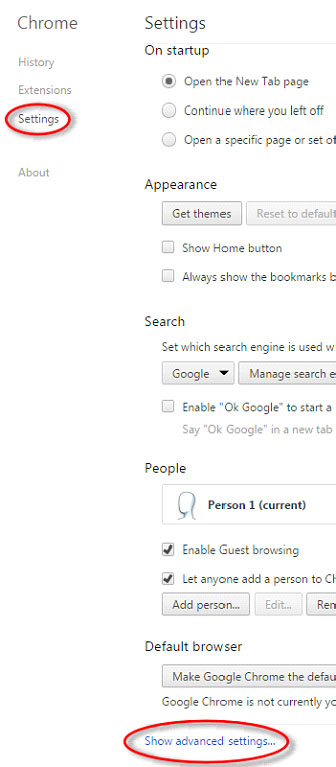
Under the ‘Settings’ section, all the way at the bottom, click on ‘Show advanced settings’.
In the window that appears click on ‘Clear browsing data’.
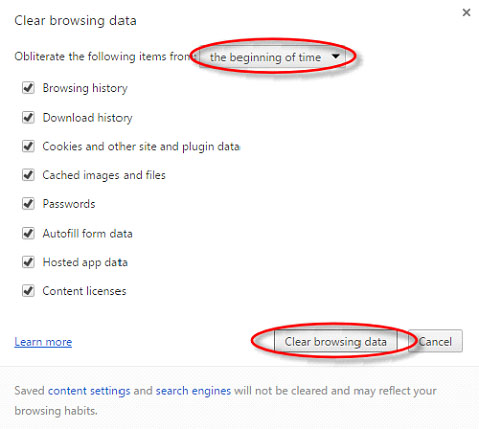
In the window that appears select ‘the beginning of time’ for a time frame. To clear your entire cache, select all items. Then click ‘Clear browsing data’.
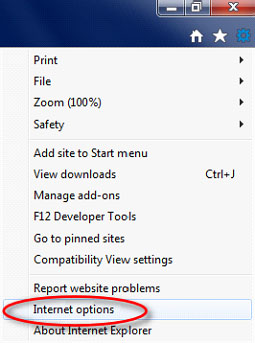
To clear your cache and cookies in Internet Explorer:
In the upper right-hand corner click on the ‘Tools’ symbol (gear) or, click ‘Alt + X’.
![]()
Select ‘Internet Options’
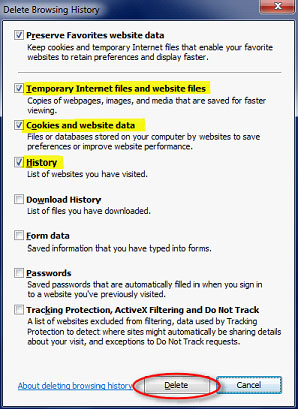
Select the ‘General’ tab. Under the ‘Browsing History’ section click ‘Delete’.
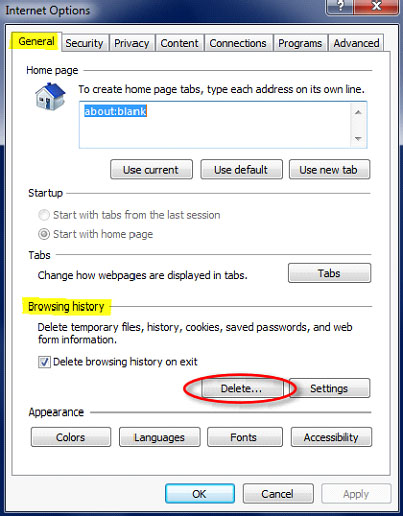
Be sure that ‘Temporary Internet Files, Cookies, and History’ are check marked and select ‘Delete.’
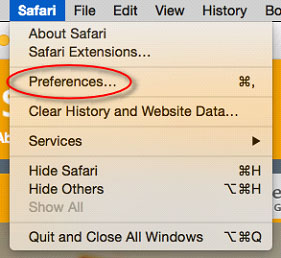
To clear your cache and cookies in Safari:
Click on ‘Safari’ in the upper left hand side of the screen. Select ‘Preferences’ from the menu.
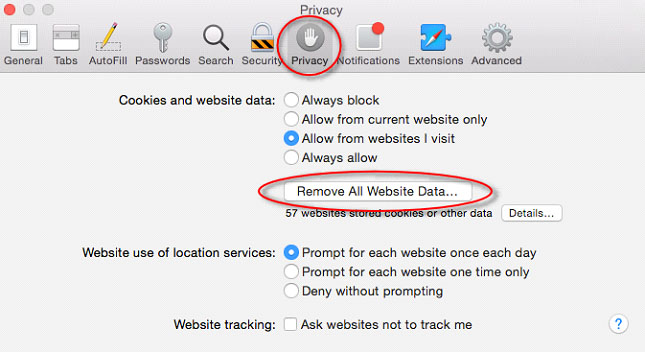
In the window that appears, click the ‘Privacy’ tab. Click the button ‘Remove All Website Data’.
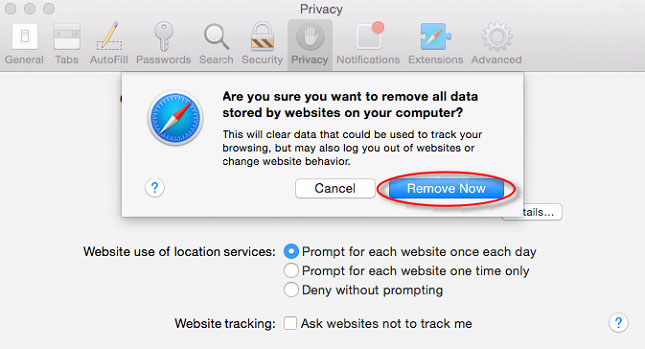
In the pop-up window click ‘Remove Now’.
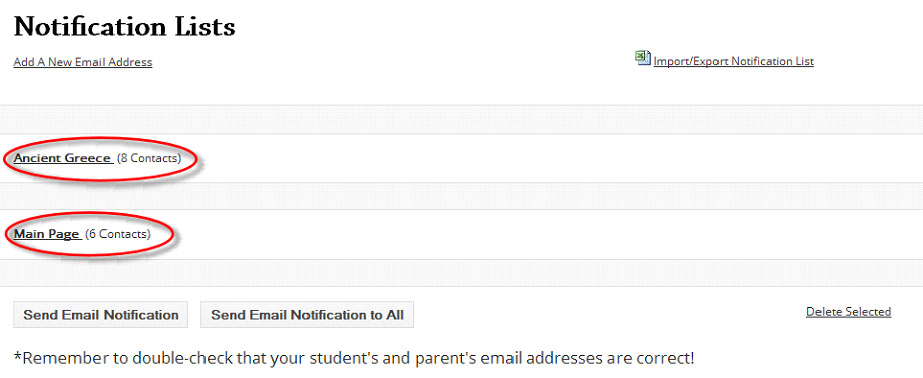
Contacts: Adding Emails Individually
To add contacts individually, click on “Contacts” located in the left margin of your desk.
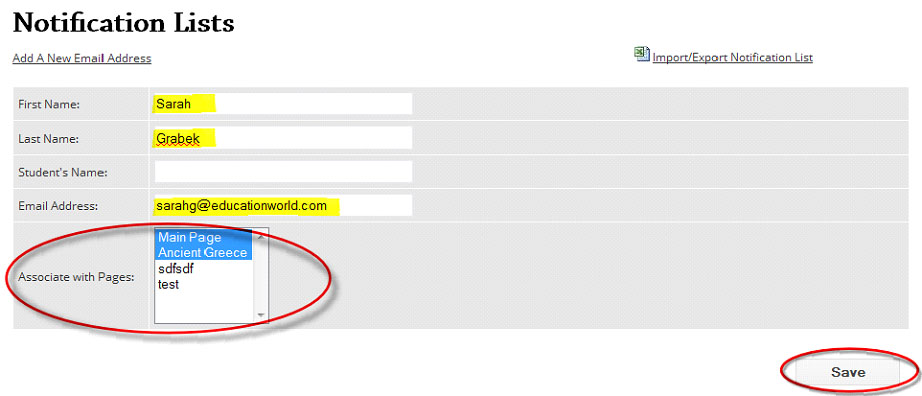
- Click on ‘Add A New Email Address’.
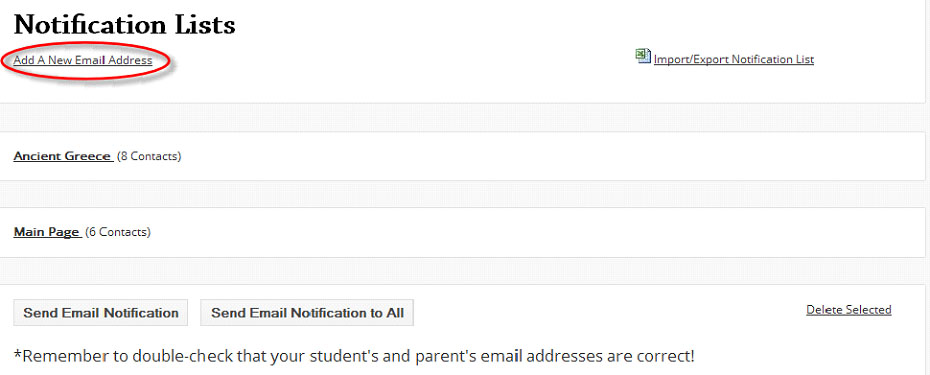
- Complete the form, filling in all fields that apply to your contact. You must select which page(s) notification list you would like the contact to be added to. (Hold the Ctrl key to select more than one page or to deselect pages.) Then, click ‘Save’.
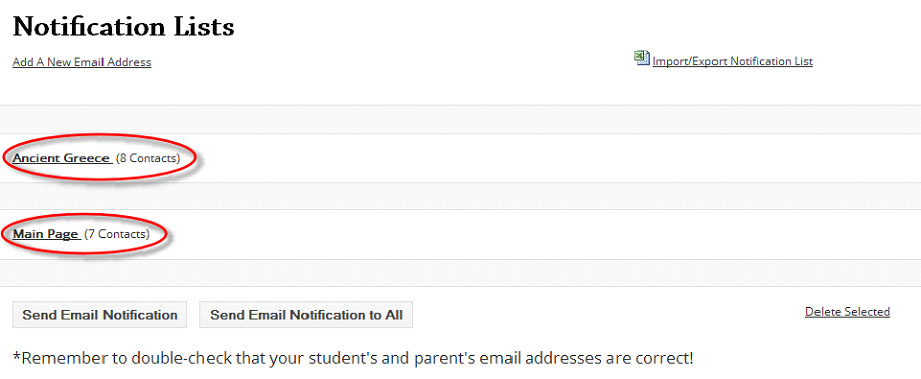
You will then see a confirmation of the number of contacts uploaded to your notification list.
Contacts: Importing Emails by CSV File
Uploading a CSV file is a quick way to add email contacts to your ‘Contacts’ and ‘Newsletter’ notification lists.
*Please see ‘Creating a CSV File’ for instructions on how to create an up-loadable contact list.
For Contacts:
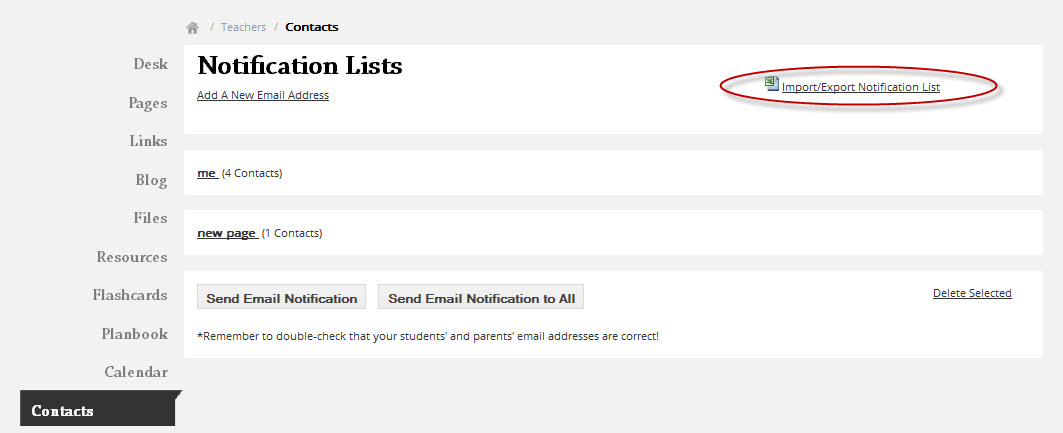
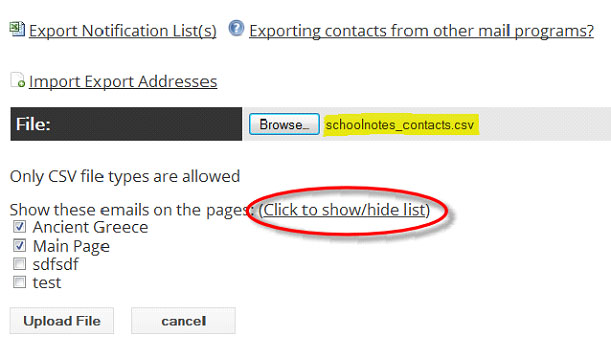
1) Click on "Contacts" in the left margin of your desk and select "Import/Export Notification List."
2) Browse your file folders until you locate your CSV file. (If your pages are not visible, select ‘Click to show/hide list’ to reveal) Check the box next to the name of the page(s) that you want the list assigned to and then click ‘Upload File’. *Important* Be sure that there is no space in the title of the CSV file.
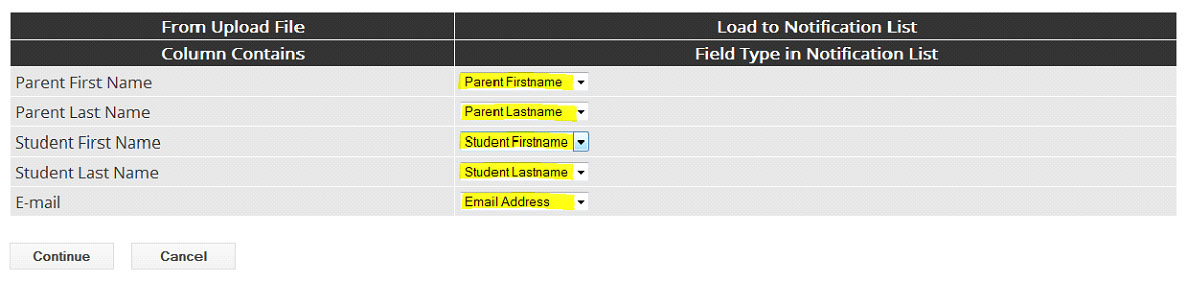
3) Next you will need to match the corresponding fields within your CSV file with the matching field type in the system, then click ‘Continue’.
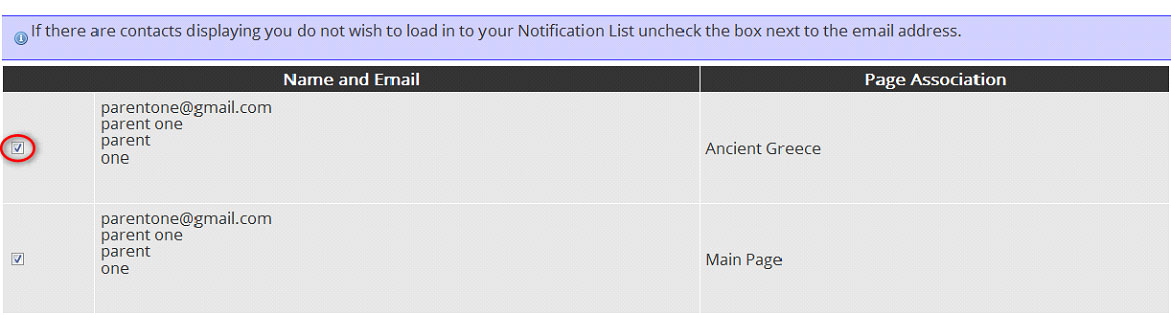
4) Next, verify that you have only the contact information that you wish to upload. If there is information you do NOT want included from the file, uncheck the box next to that contact:
Then select "Load Notification List."
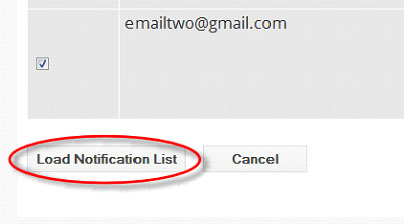
You will then see a confirmation of the number of contacts uploaded to your notification list.
For Newsletters:
Select "Newsletters" located in the left margin of your dashboard and then select "View Subscribers."
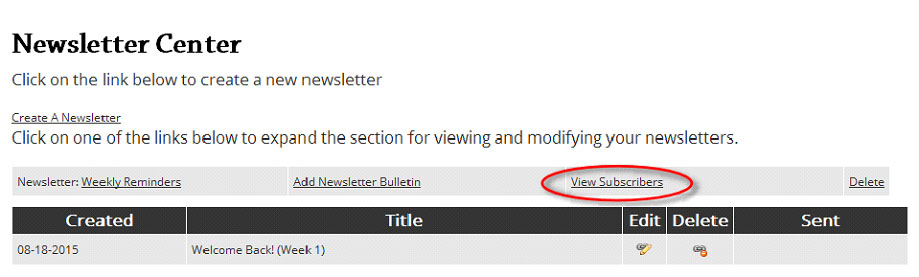
A new window will open. Select "Import/Export Subscriber List" *Important* Be sure that there is no space in the title of the CSV file. Locate the file name and upload the file.

Next: Follow steps 3 and 4
Creating a CSV File
The easiest way to create a CSV (Comma Separated Value) file is with Microsoft Excel.
- Open a new Excel Workbook. SchoolNotes allows you to attach a parent and/or student name to each contact you create. With that in mind, you can create a file that contains a list of e-mails only
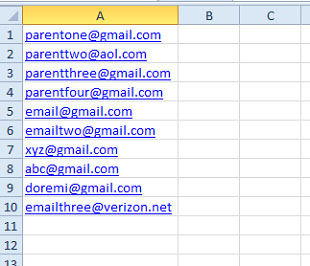
Or, if you have the names of the parents/students you can include that data as well.

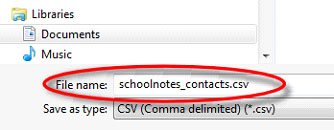
- Once you have all of your contacts listed you will need to save your document as a CSV file. To do this select ‘Save As’ from the File Menu. When the window opens, select ‘CSV’ from the “Save as type” menu:
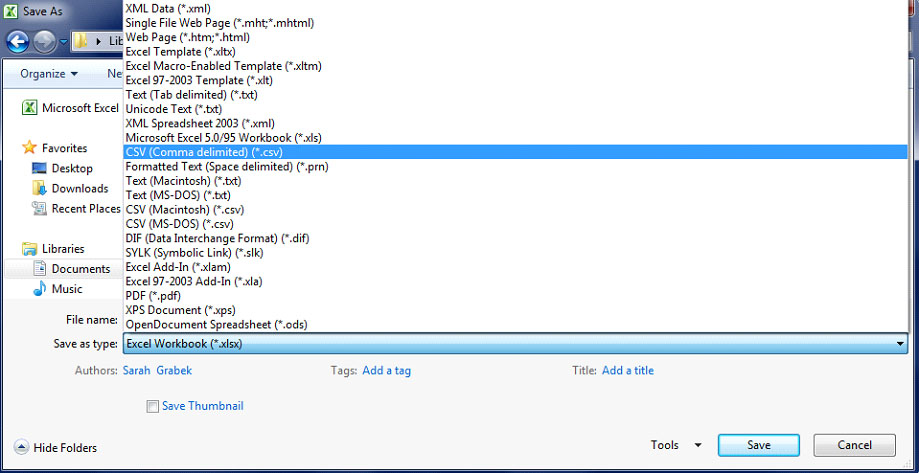
*Important* When naming you file, be sure there are no spaces in the file name:
You have now created an up-loadable, text-only contact file!
Creating a Page and Adding Content
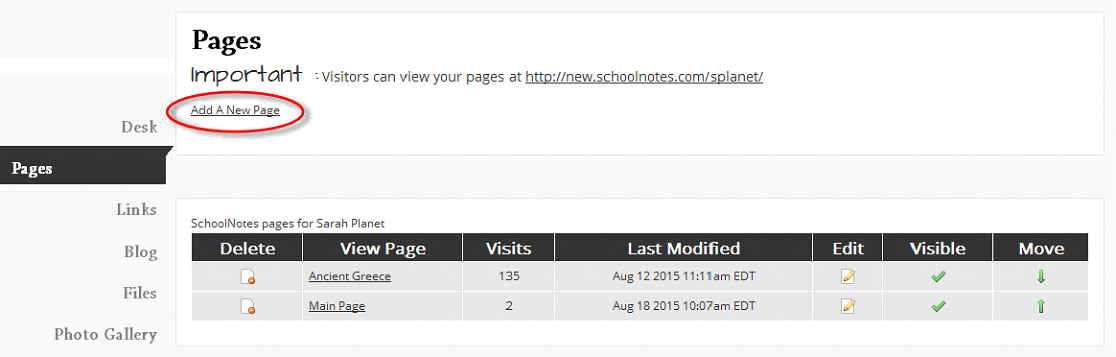
To create a page in your account, click on ‘Pages’ listed in the left margin.
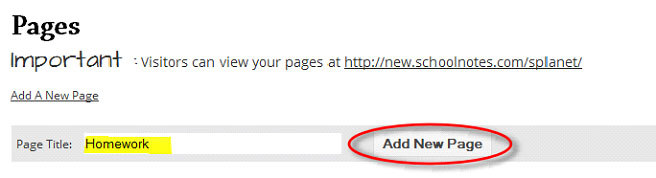
- Select ‘Add a New Page’.
- Enter in a Page title, select ‘Add New Page’, and your page has been created!
Now let’s add some content.
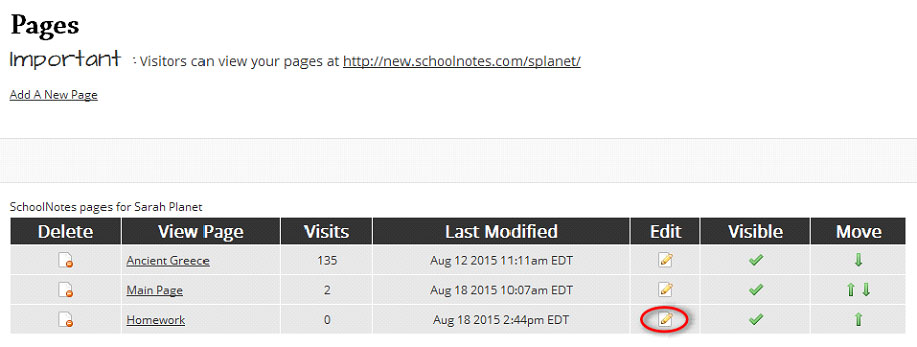
- To add content to your page, select the ‘Edit’ symbol next to the name of the page you want to edit:
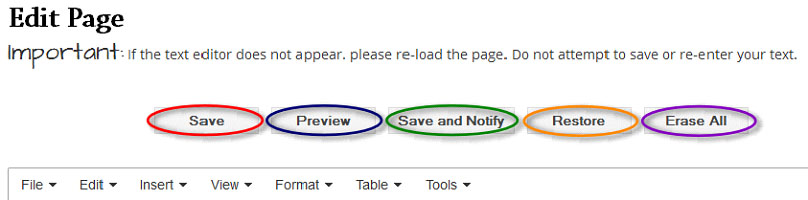
The tabs at the top of your text editor perform the following functions:
- Save- Saves your page update.
- Preview- Preview your update.
- Save and Notify- Saves your page update and notifies those on the notification list assigned to that page that changes have been made.
- Restore- Restores the page to one of five previous save points.
- Erase All- Removes all page content. *When you click this button, all content will disappear immediately. You will only be able to recover it, with the ‘Restore’ feature, if you had saved your page with that content previously.*
*NOTE* Once you have finished editing your page and you wish to send notifications to parents that recent updates have been made, you MUST click on "Save and Notify".
When editing your page, you will find many tools to work with. There is a Text Editing Toolbar similar to what you find in Microsoft Word. With this toolbar you are able to bold1, underline2 and italicize3 your font. There is left4, center5 and right6 justification buttons, bullet lists7 and numbering buttons8 as well as a button to insert images9. We highly recommended you type all of your text into your page and then go back and modify your text using the toolbar. You can change the font color10, highlight your text11, change the font family12 and change the font size13. *Reminder*, when you turn one of the tools on in the toolbar (by clicking on it), it will remain active until you turn it back off. You can also make the editor window full screen14. (You will need to exit this mode to save your work.)

You are now ready to add your content. Feel free to add as much or as little information as you want, the sky’s the limit! You can be as creative or as basic as you would like, it’s up to you.
*Helpful Tip* - We recommend that you ‘Save’ your work as you go. The internet is an unpredictable place and to prevent a loss of work (and a waste of your precious time!) it’s a good idea to ‘Save’ your work periodically while you are drafting your update.
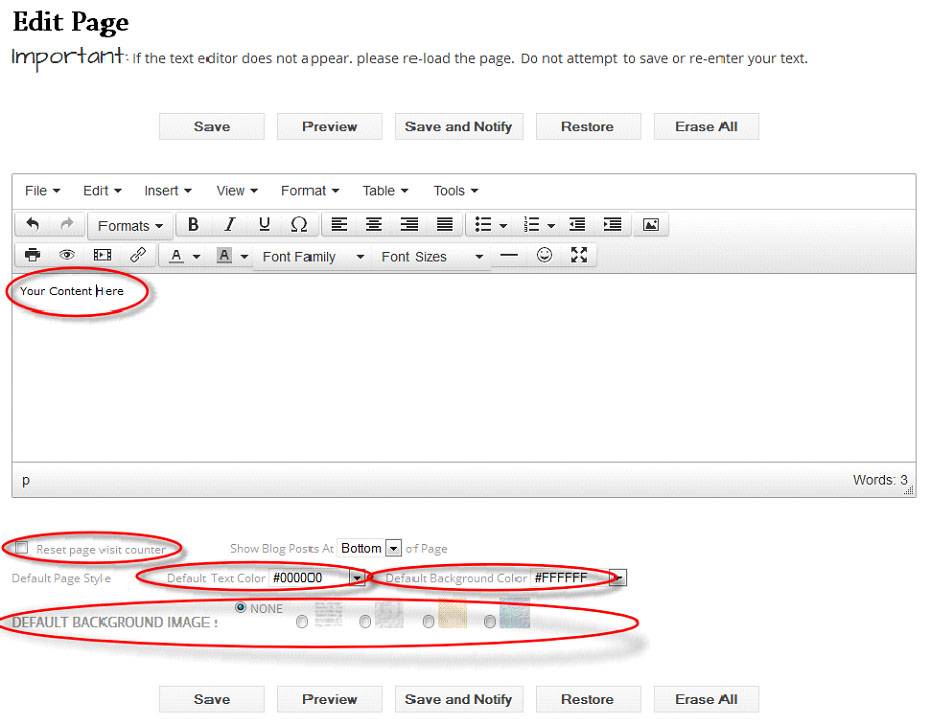
Below the editor window there are additional page formatting tools. You can set a default text color, as well as set a default background color or a background image/pattern.
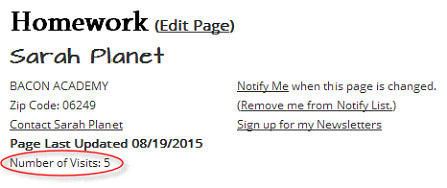
Additionally, one of the features of the site is a page visit counter. This is displayed in the header of each of your pages:
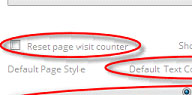
To reset a page’s counter, simply check the box located below the editor window:
*A Note about Pasting*
Pasted MS Word content contains a lot of embedded styling that works well in MS Word, but behaves poorly on a website. The best strategy is to paste plain text into the editor and format it with the editor's formatting tools. This can be done by pasting your content into a Notepad document first and then copying and pasting from that document. This will remove the formatting that does not behave properly on the web.
There is also a plain text mode within the editor settings; this will allow you to skip the Notepad step.
This can be found here:
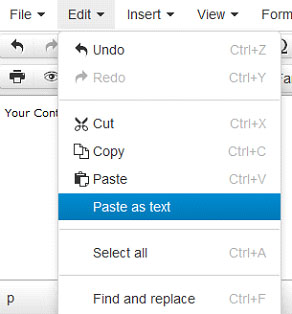
An additional note about the editor, in order to copy/paste/cut you will need to use the standard keyboard shortcut keys- Ctrl+C (copy), Ctrl +V (paste), and Ctrl+X (cut).
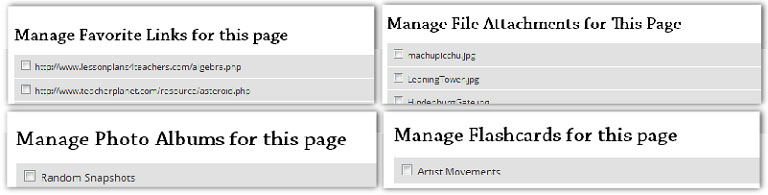
The last feature available when creating/editing your pages is the ability to manage your Links, Files, Photo Albums and Flashcards assigned to the page. Simply click the check box for those items you want to feature on that particular page and click ‘Save’.
Desk Features
SchoolNotes has a new look with updated features! On the dashboard, now called Desk, you will see:
- A place to add a profile picture
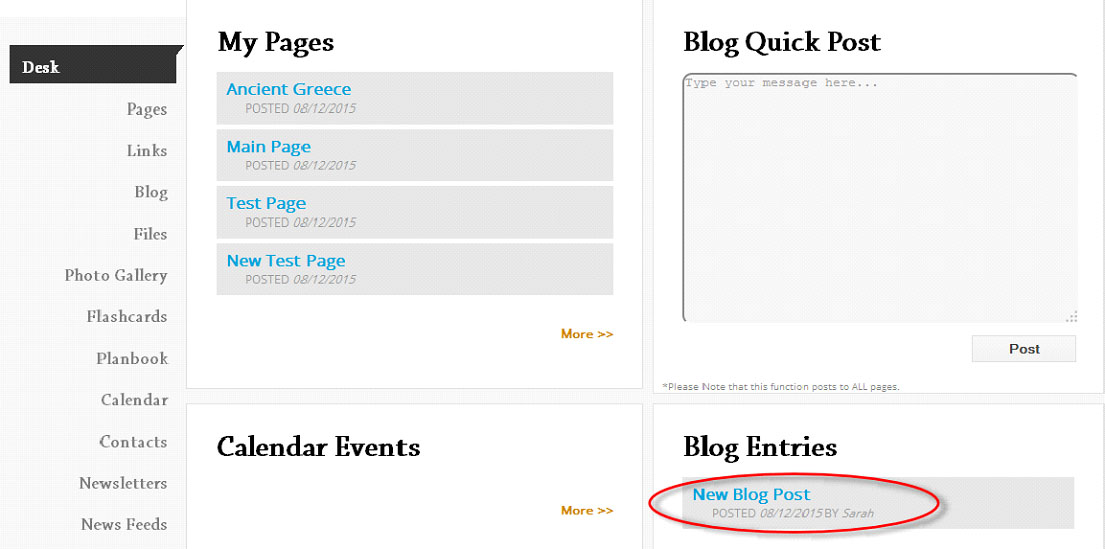
- In a hurry? The dashboard offers easy access to your pages, calendar, Quick Post, Blog, and Plan Book (for enhanced users). Access your pages from "My Pages" or place a comment for your page on "Quickpost". View upcoming events for your calendar, view latest blog entries and for Enhanced Users- double check your planbook. All from the dashboard!
- Educator Resources: These links provide quick access for page ideas, Word Doc and PDF Templates, Clip Art, and more!
- RSS News Feed Reader: Stay abreast of current news and ideas in the world of education with this feature!
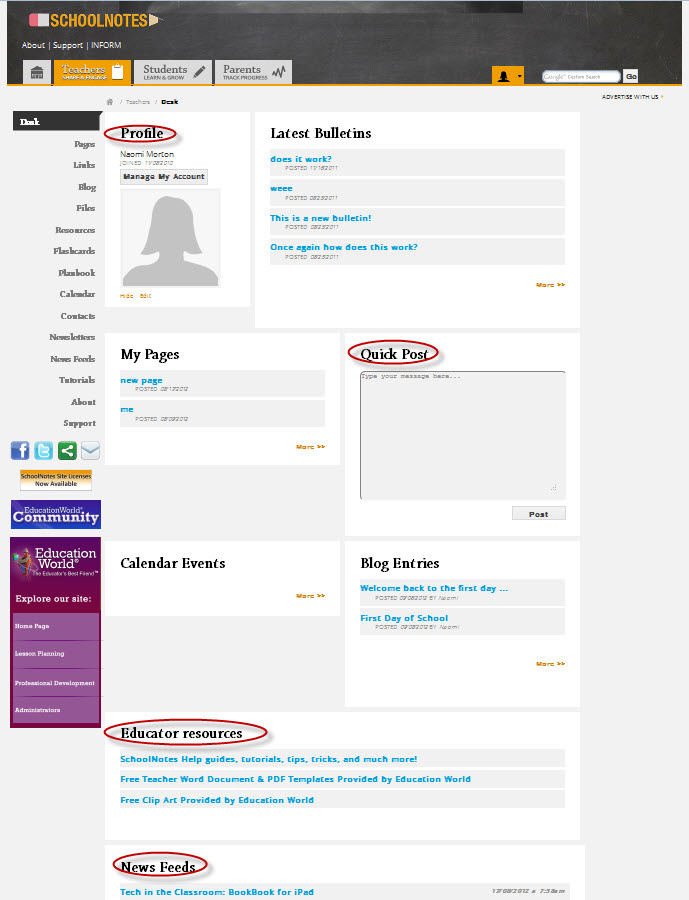
Check out the new features! And if you need a little extra help, be sure to click on "Support" in the upper right corner (under the small profile image) for the User's Guide and Frequently Asked Questions.
Have Fun!!
Enable/Disable Java Scripts in Firefox
To Enable/Disable Java Scripts in Firefox:
Locate the "Firefox" tab in the upper corner of your screen. Select "Options" and then "General."

After you get to this window, you will click on "Manage Add-ons" and you should see the following:

Enable/Disable Java Scripts in Internet Explorer
There are two ways to enable/disable java scripts in Internet Explorer
First Way:
From the Tools Menu, or the Tools drop-down in the upper right, select Internet Options

Next, select the Programs Tab and click on "Manage add-ons"

Highlight the Java Plug in and click either Enable or Disable in the lower right hand corner. Then click Close.

Second Way:
From the Tools Menu, or the Tools drop-down in the upper right, choose Internet Options
Click the Security tab and select Custom Level

Scroll to the "Scripting" section of the list. Click Disable or Enable

Close and restart your browser.
Enable/Disable Java Scripts in Safari
To Enable/Disable Java Scripts in Safari, locate the tools icon in the upper right corner of the browser bar and select preferences.

Click on the Security Tab and Enable or Enable JavaScript and close.

Files
Click on the “Files” link in the left margin of your desk:
You will then be taken to the following page within your account:
Click on “Add a New File” to add your first file. Additional boxes will appear for you to populate. Enter a title and “browse” your computer documents to locate the file. Next, select the page(s) you want this file to display on and then click “Add New File” to save your changes.
*Pay special attention to the list of files you are able to upload into your account – if you do not see it in the list do not upload it into your page.
Once your file has been added a list will appear of all of your attachments and what page they are attached to. By clicking the “Edit” icon, you can make changes to the title of the document or what page(s) you want the document to display on. Make sure to save your updates. By clicking the “Delete” icon, you will delete the file from the page(s) it is listed on as well as from within your “Files” section.

Flashcards
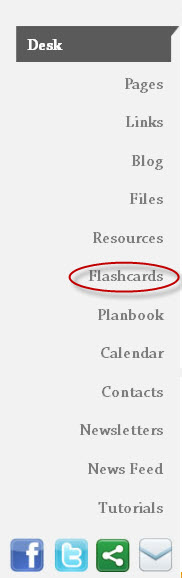
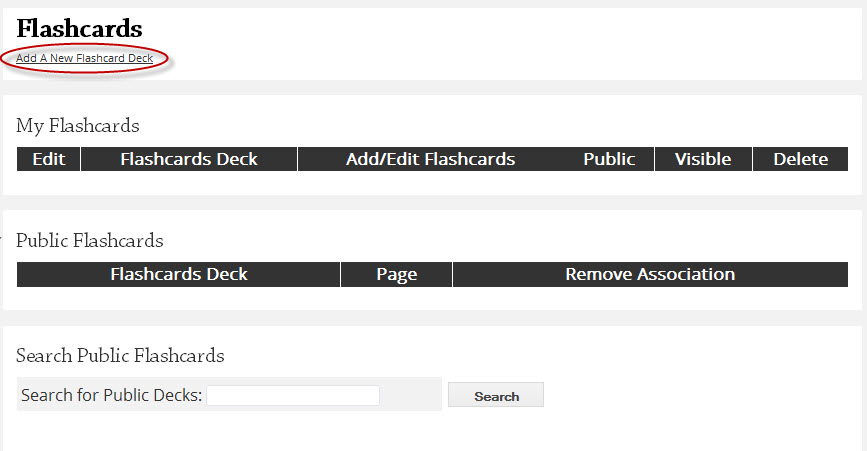
STEP 1: When you first log in to your teacher dashboard to work with your flashcards, you will click on the “Flashcards” link:
After clicking on this link, you will see:
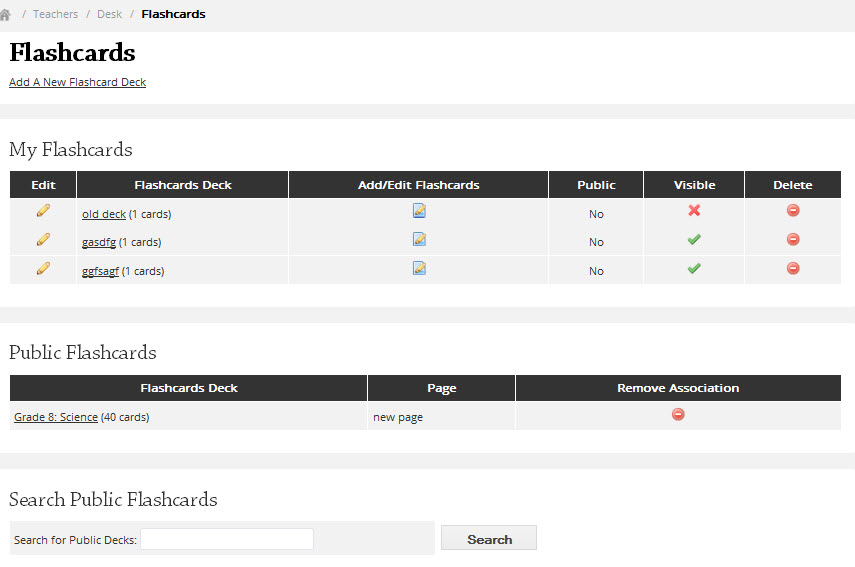
STEP 2: There are two ways to work with your flashcards, search for a public deck or create your own. When you search for a public deck, you are searching the flashcard decks of other SchoolNotes users who have chosen to share their flashcards with you. So what you will need to do is type in a “keyword” you would like to search on, for example Science. Click on the Search button and watch your results appear:
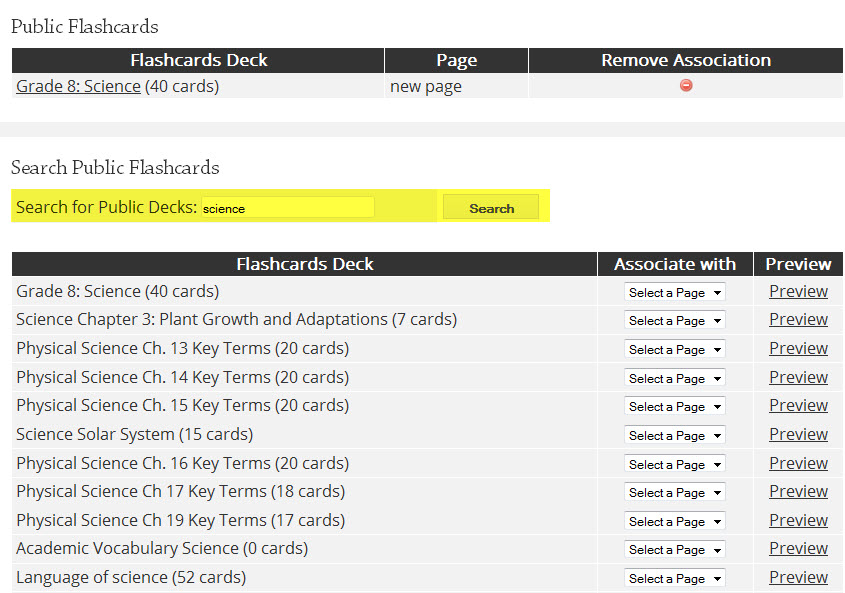
STEP 3: You can click on the preview link to see the flashcards before choosing any public decks to attach to your page. Once you have decided if you want to share this deck, you will select the page you want this flashcard deck to appear on from the drop down menu.
You will then scroll down and click the Save button to save your selections. The flashcards you have chosen to share from other teachers will now appear in your Public Flashcards table:
You will then see the flashcards listed under Public Flashcards.

STEP 4: The other option is for you to create your own flashcards deck from new. You can do this by clicking on the Add New Flashcard Deck link:
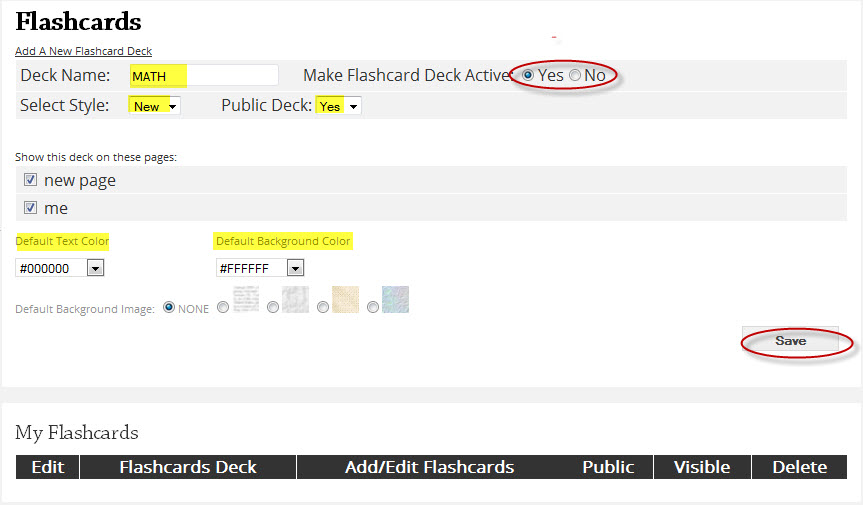
STEP 5: You will then need to fill in the general information about your new flashcard deck. You can also choose a background color and the font color from this menu. You will need to enter in the name of the deck and decide if you want it active (for your students to see) or inactive (for your students not to see). You can also decide if you want your flashcards to look like the flashcards on the old SchoolNotes website or you can choose the new look and feel. I will show you that in a bit. The next thing to determine is if you want to “Share” your flashcards with other teachers by making your deck public (to share) or not public (not to share). Next, click the page name(s) that you wish the flashcards to appear on. Choose a default text color or background if you like and then click “Save.”
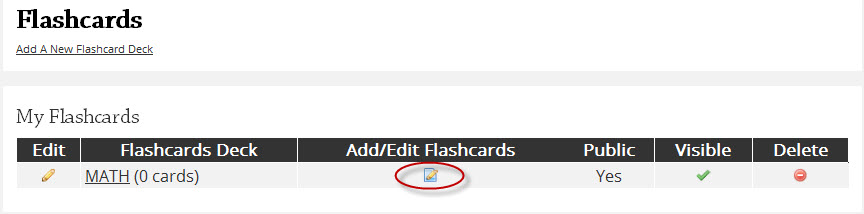
STEP 7: You are now ready for the next step which is making your cards. Click on the “Add/Edit Flaschards” icon in your My Flashcards table and on the next page click on the Add A New Flaschard link. If you have chosen the new style flashcards you will see this: NOTE: Premium account users have the ability to upload an image into flashcards, regular account users will not see this option.
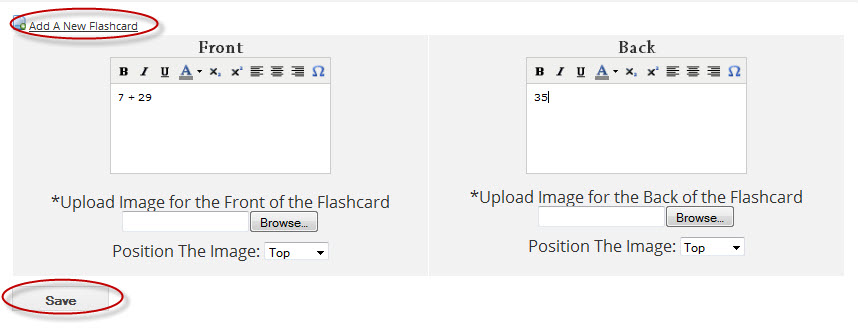
STEP 8: You can change the font you type in using the toolbar provided as well as upload images into your flashcards and choose if you would like the image to show at the top or bottom of the flashcard. Once you have entered everything in to your new flashcard, click save.
You will receive a message that states your flashcard has been created successfully.
STEP 9: To create more flashcards follow the same steps again. To edit or delete the flashcard you have created click the Edit or Delete icons, to move the flashcard in the order it is in click either the up or down arrow and to preview the flashcard click on the Preview icon. Click the View Back link to switch to the back of your card. Select back to Edit to return to your flashcard section.
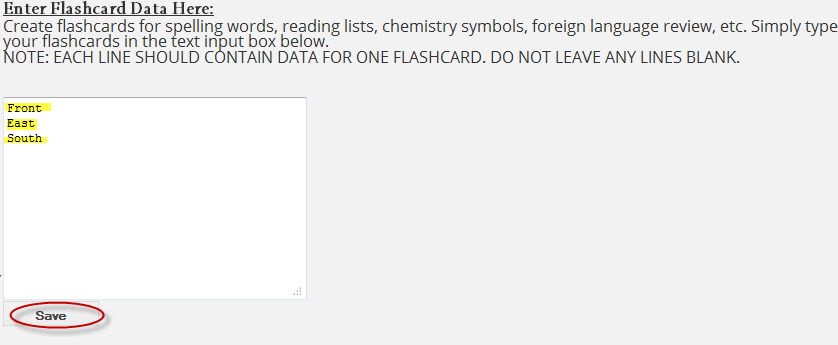
STEP 10: If you choose the old style when you are creating your flashcards you will follow steps 4-8. From here, you will have a different set up for creating your flashcards in your deck. Each line of text you enter creates a new flashcard. When you finish entering in your text, click Save and you will see a save confirmation:
STEP 12: Click on your Flashcards link in the left margin to return to all of your flashcards and then click on the name of your old style flashcards to see what they will look like to your students:
**You are not able to change anything as far as the format of these cards and you are not able to upload any images.
Note: You can also manage your flashcards by clicking on the icon beneath the text editor on your main editing page
Linking Documents within Pages
First you must upload the file you wish to utilize within the body of your page. For instructions on that process review the ‘Files’ tutorial.
Now that you have gotten the file loaded into your file storage space, you can insert a link to this document into the text area of a SchoolNotes page.
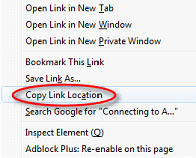
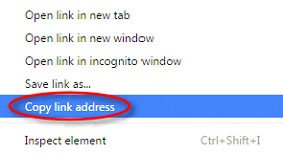
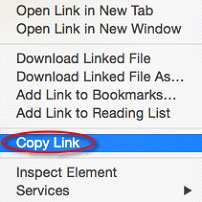
While in the "Files" section of your account, right click your mouse button on the name of the file.
For Mozilla Firefox users, select "Copy Link Location":
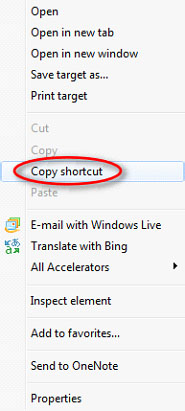
For Internet Explorer users, select
For Chrome users, select
For Safari users, select
Once you have retrieved the link to the file you want to feature within your page, click on the ‘Pages’ in the left margin. Select the edit icon next to the page you want to add the document link into. Type the title of the document or, the text you would like to link the document to, where you would like for it to live on your page then highlight the text:

You will then click on the link tool in your toolbar to insert your document link:

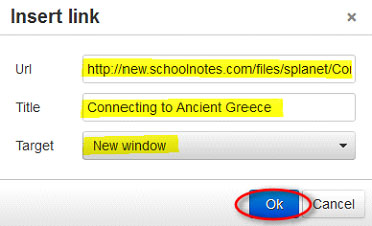
You will paste the URL to your document into the ‘URL’ space provided. If you would like, you have the option to specify a title for the link. I would recommend changing the ‘Target’ setting to ‘New Window’. This will open the document in a separate window. Then, click ‘Ok’.
What you have typed is now ‘hyper linked’ to your document.
Linking a Video Using "Files"
If you have a short video clip on your computer that you would like to upload to your page (15 seconds or less for free SchoolNotes users), you may upload it using the "My Files" section of your account.You will need to make sure that the file is saved as a MPEG file.
If your file is not currently and MPEG you can convert it through a program from Prism Video File Converter.
Once you have downloaded Prism, open up the program so that you see the image below and click on Add Files.
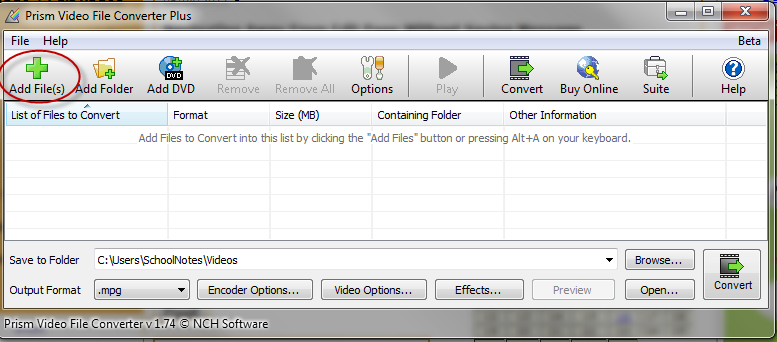
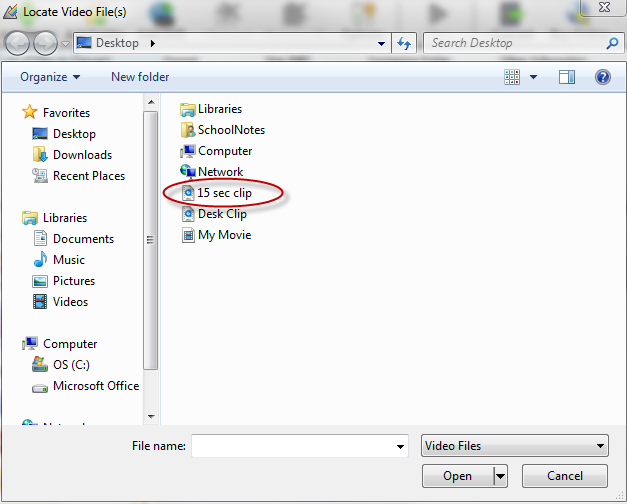
A new window will appear that will allow you to locate your video. Select your video and click on Open:
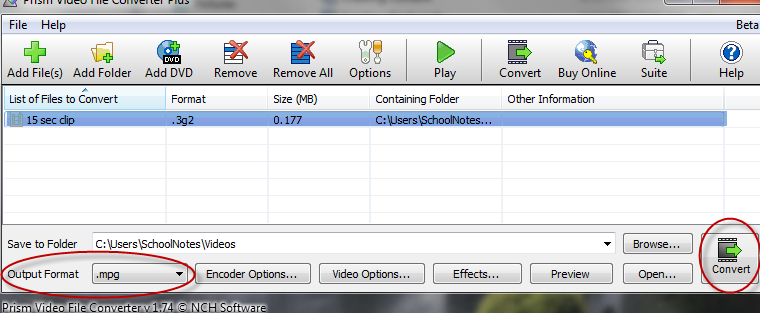
You will then see your video appear in the Prism program. Click on the video so that it is highlighted in blue. In the lower left corner you will see "Output Format" select .mpg and then "Convert."
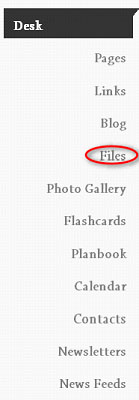
Once the conversion is complete, click on "Files" located in the left margin of you dashboard:
You will then see "Add A New File." Click on this and enter in a title for your film, then click "Browse" to locate your film and click "Open." Once you have this information, click on the name of the page that you want to assign the video to.
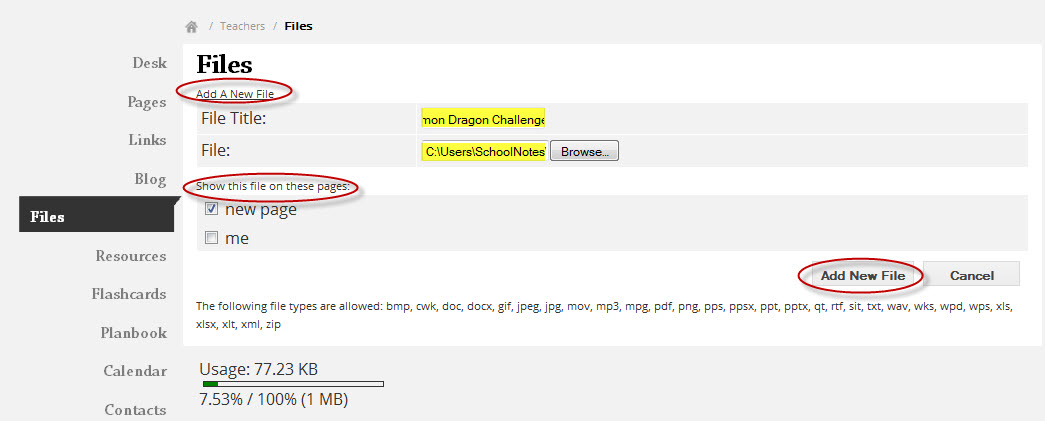
Select "Add New File." You will receive a message letting you know that the upload was successful.
Links
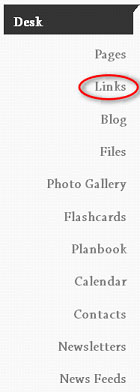
To add and manage favorite links, click on "Links" in the left navigation bar.
To add a new link, simply click on “Add A New Link”.
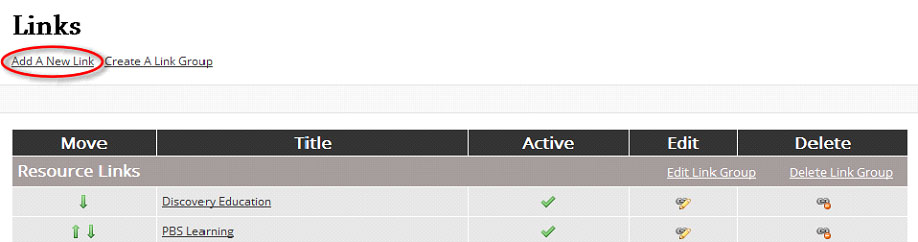
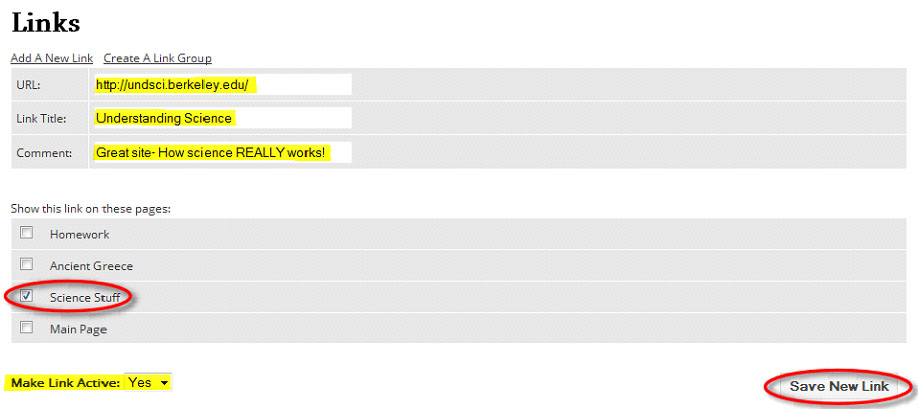
A new section will appear where you will enter in the information for your link. Enter in the URL, Link Title, and if you would like to, a comment. Select the page(s) you want the link associated with, make it active or inactive, and select ‘Save New Link’.
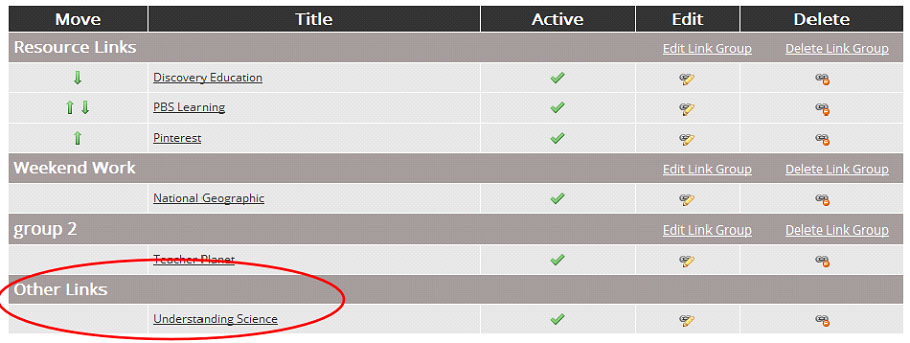
When you add any new links they will automatically be added to the ‘Other Links’ group that comes standard with your SchoolNotes account:
If you want to take your link organization a step further, you can create a link group(s).
To create a link group, simply click on ‘Create A Link Group’:
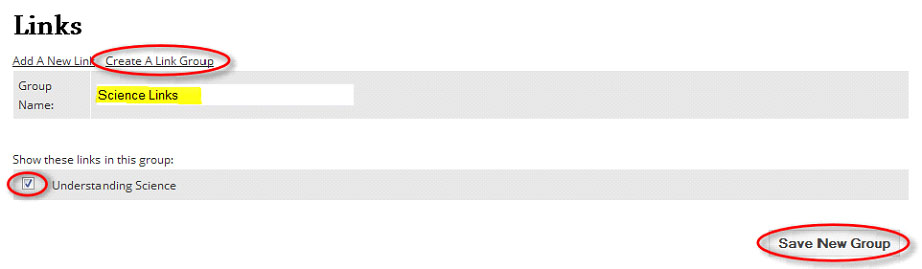
You will need to enter a name for your group. If you have any ungrouped links they will appear under the ‘Show these links in this group:’ section. Check the corresponding box to add any of them to this group. Then click ‘Save New Group’.
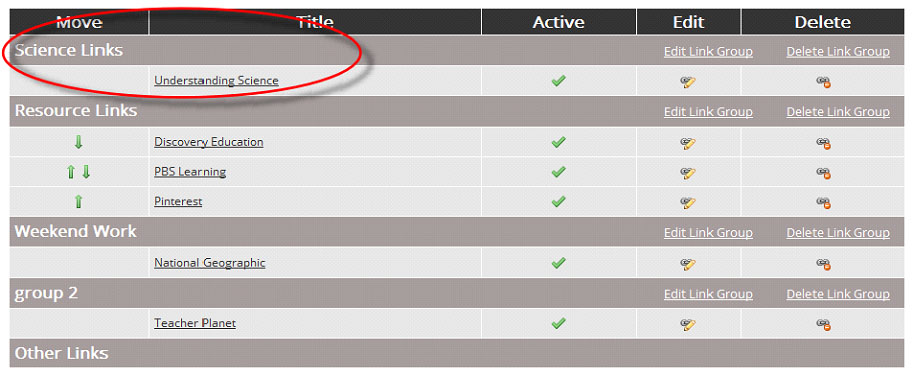
You will now see the new link group (with added links, if applicable) under your links section:
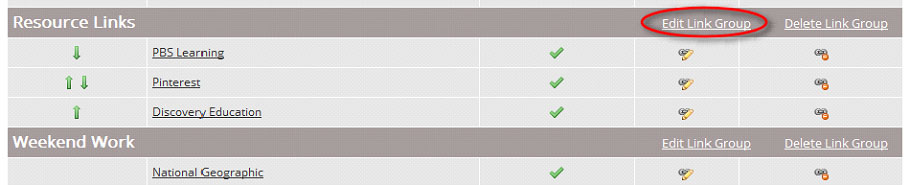
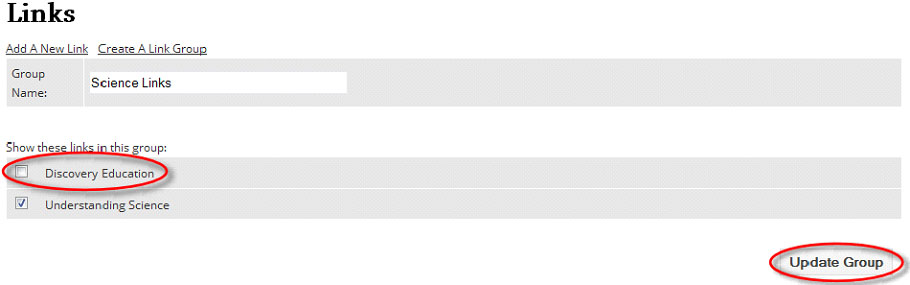
You can also move links from one group to another. If the link is already assigned to another link group, click ‘Edit Link Group’ for the corresponding group:
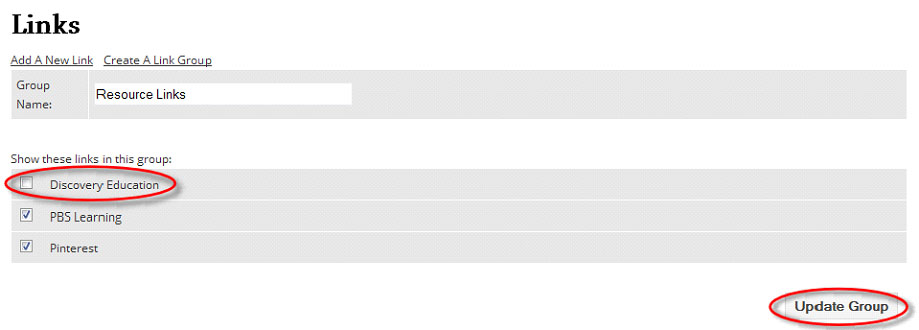
You should see all the links that are assigned to the particular link group listed. Simply uncheck to link you would like to move then, click ‘Update Group’:
Now you should see your link moved to the ‘Other Links’ section:
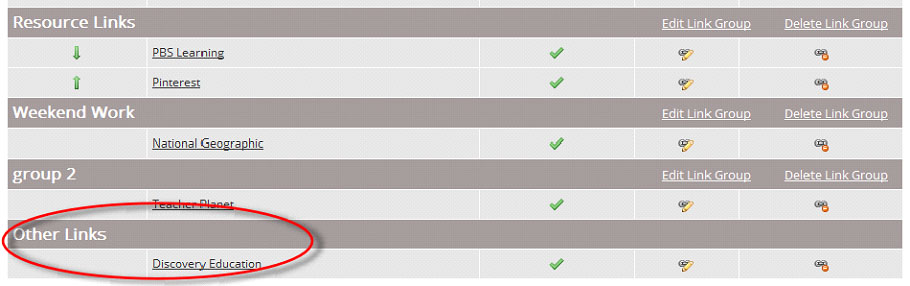
To assign it to a different group, click ‘Edit Link Group’ for the new group, check the box next to the link you are adding then, click ‘Update Group’.
You should now see your link moved to the updated link group:

If for some reason your link is not appearing under the group when you are on the public view of your page, it’s possible the link is not assigned to appear on that page. You can check this by clicking the ‘Edit’ symbol for the link in question:
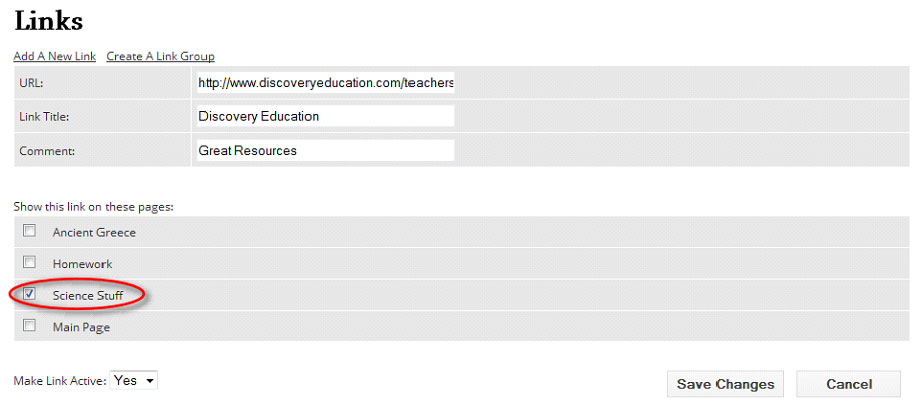
For the link to appear the box will need to be checked next to the page name then, click ‘Save Changes’.
Within each link group you can also change the order of your links, simply click on the green arrow buttons to the left of the link titles and you can move them up or down:

Note: You can also manage your links when editing any of your pages. Below the editor window, locate the ‘Manage Favorite Links for this page’ section and simply check the box next to the link you would like to show on the page.
Migrating From Old SchoolNotes to New SchoolNotes
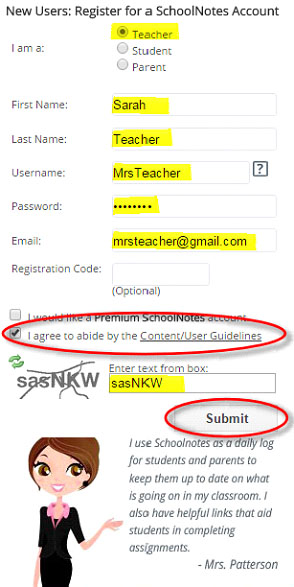
To migrate (move) your current SchoolNotes page(s) over to the new site, please visit http://New.SchoolNotes.Com and, if you haven’t already, create a new account.
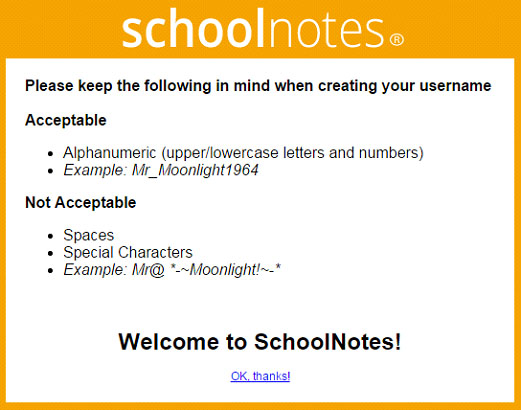
Your Old SchoolNotes user name may or may not be available on the new site, the system will let you know when you try and register. When selecting a username keep the following in mind:
Fill in each section and be sure to check the ‘Content/User Guidelines’, enter the captcha and click ‘Submit’.
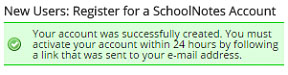
If your registration is successful you will see the following message appear at the top of the registration form:
Once you have succesfully activated your account you will be ready to migrate your Old SchoolNotes pages over to the new site.
**Please Note** Once you have migrated your page(s), your Old SchoolNotes account will be gone. With technology, it's always a good idea to cover all your bases; as a precaution we recommend backing up any content or information that may be housed in your Old account, just in case something happens during the migration. Once you click ‘Import’ to bring your old account over there will be no way for us to retrieve any information from the Old site.
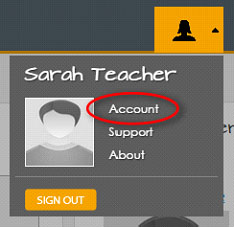
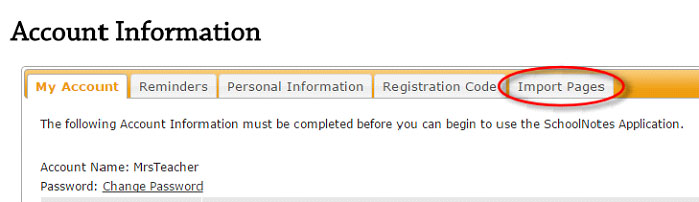
Log into your New SchoolNotes account; navigate to your account management section by clicking on the sign in area, and selecting ‘Account’ or, by clicking the ‘Manage My Account’ button located within your profile box:
Next, select the ‘Import Pages’ tab.
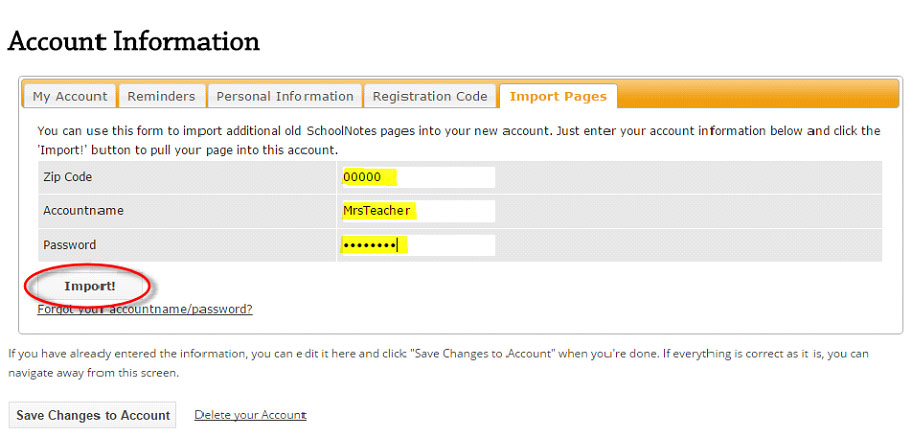
You will then need to enter in your Old SchoolNotes account information, select Import and you are all set!
**Please Note** For your students/parents to view your page, please direct them to http://new.schoolnotes.com to click on either the Students or Parents tab to search for your page(s). You can also provide them with your new page URL, this can be found at the top of your ‘Pages’ section:

Newsletters
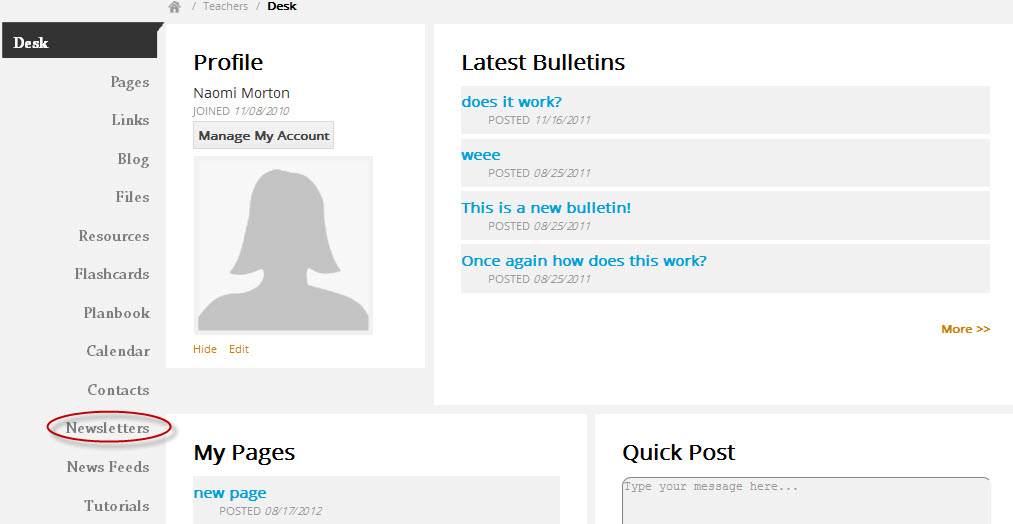
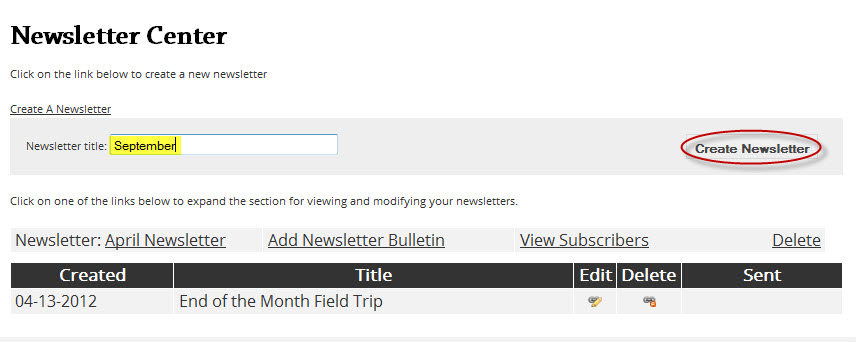
To create a newsletter, enter the Newsletter Center by clicking on "Newsletters" located in the left margin.
Next, select "Create A Newsletter."

Place in a Newsletter Title and click "Create Newsletter."
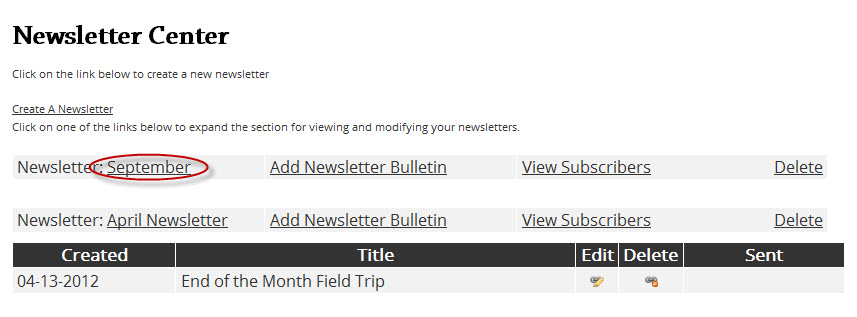
You will then see the title of your Newsletter Head appear as below:
To create the newsletter itself, click on "Add Newsletter Bulletin."
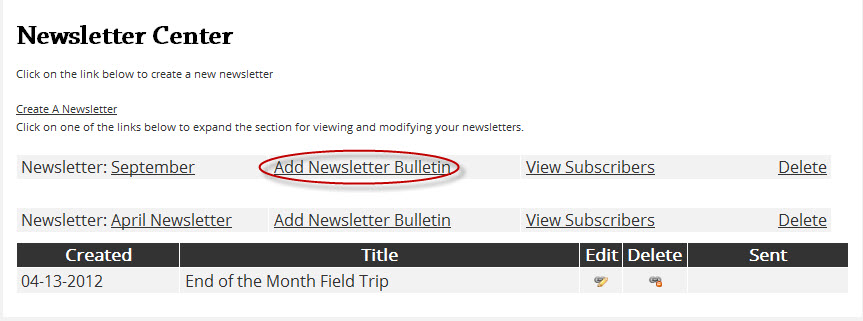
Enter in the name of the bulletin and select "Create Bulletin."
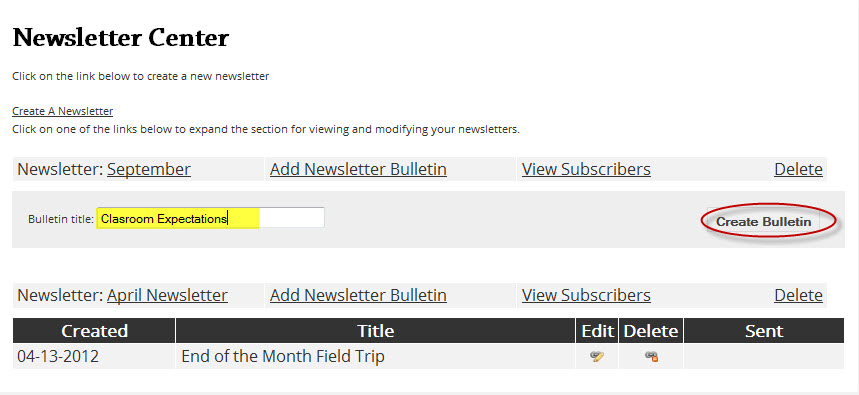
You will then see the title of the bulletin appear below the Newsletter Head as seen below. To add the content to your bulletin, select "Edit."
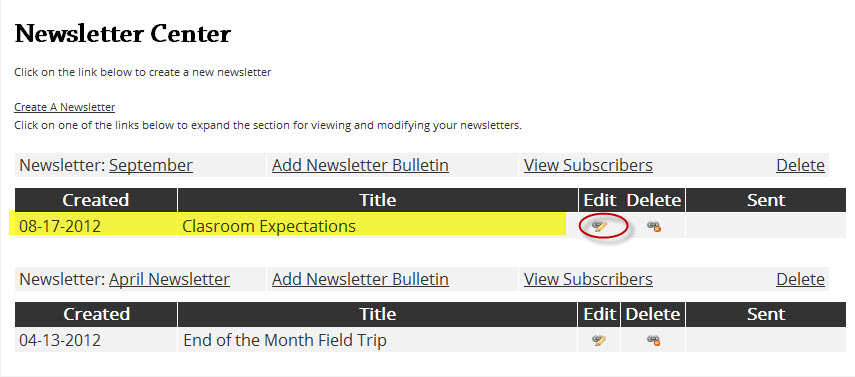
Enter in your content then select "Save" or "Save and Send Bulletin."
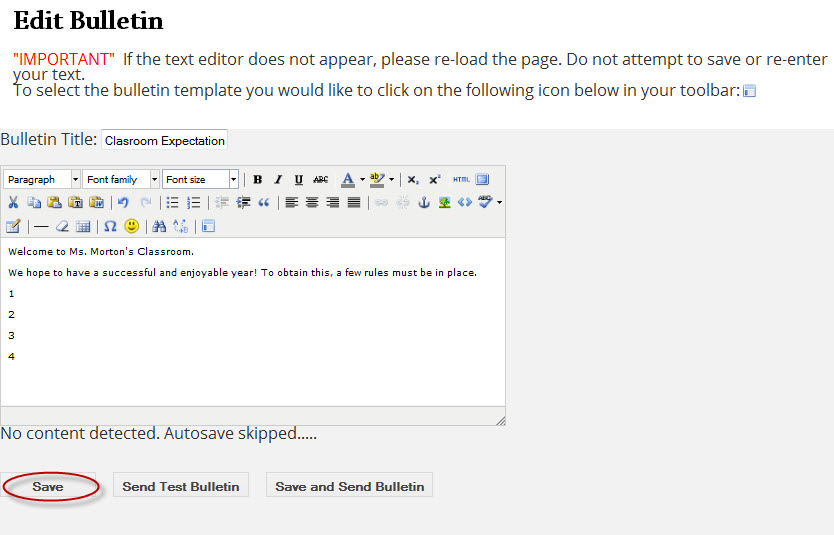
You will then receive a confirmation that your bulletin was saved successfully.
Photo Gallery
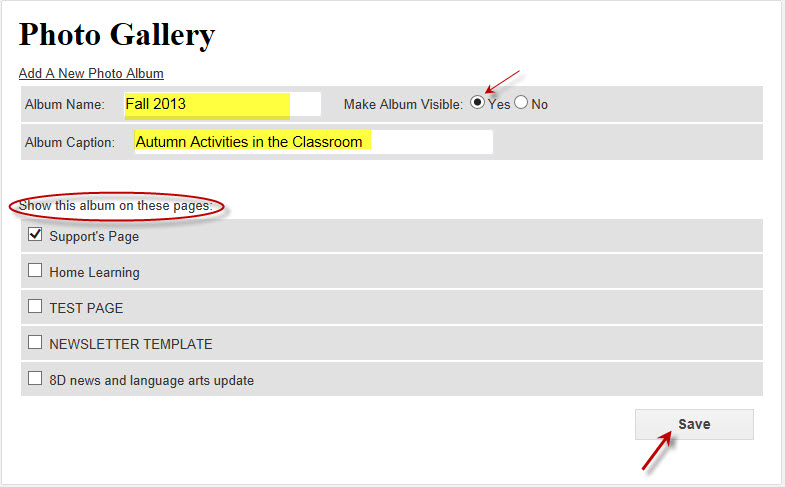
To Create a Photo Album in the Gallery:
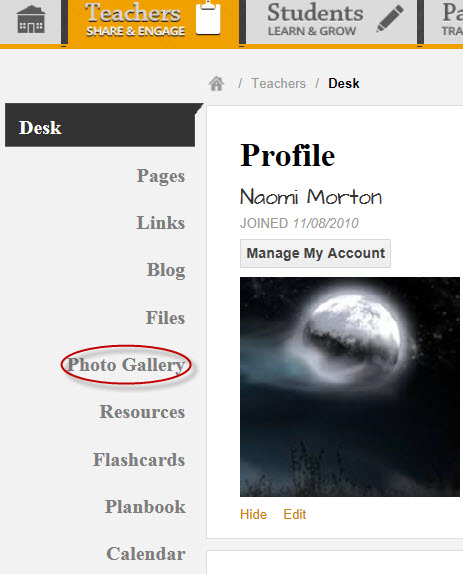
Log into the account and select "Photo Gallery" located in the left navigation column.
Next, select "Add A New Photo Album."
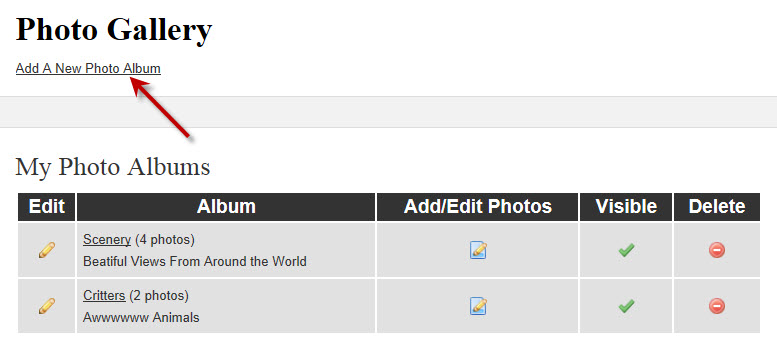
Enter in the album name, select visible, enter a caption (if desired), select the page(s) you want the album to appear on, and click "Save."
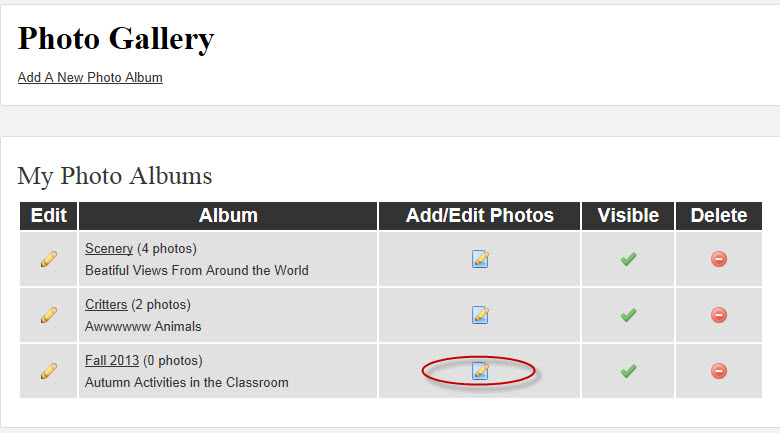
To Add Images to an Album:
Select "Add/Edit Photos"
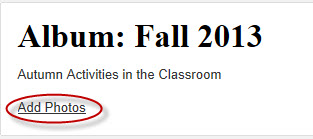
Select "Add Photos"
Click on "Choose Files"
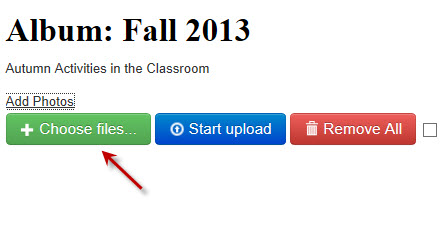
Locate the image and select "Start."
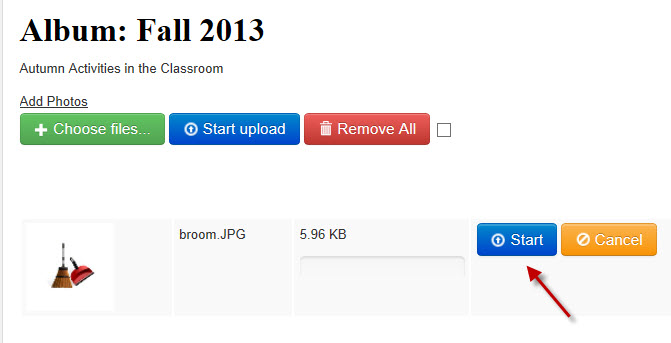
Create a caption (if desired), select "Add Photos to Album," and you are all set!

Once your image has been successfully added to your album, you will see the following message:

Planbook
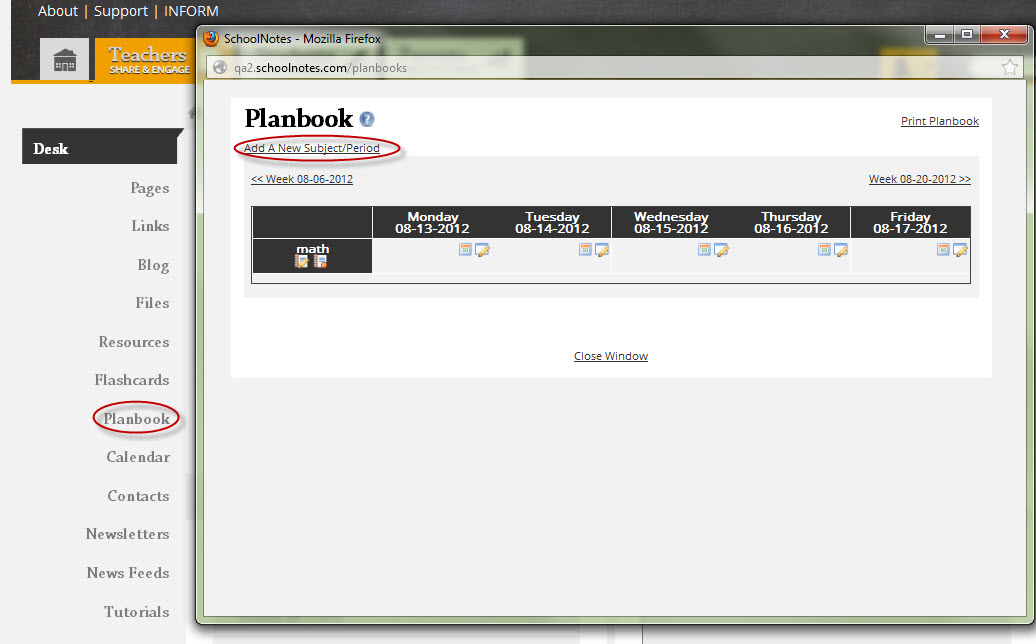
For our Personal Edition users, the planbook is a great way to organize assignments. To use this tool, log into your account and click on Planbook.
A new window will open up. Click on Add A New Subject/Period.
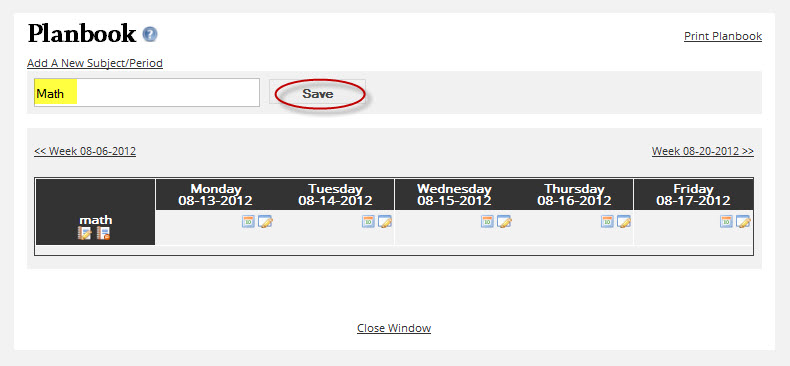
Enter in the title and click Save.
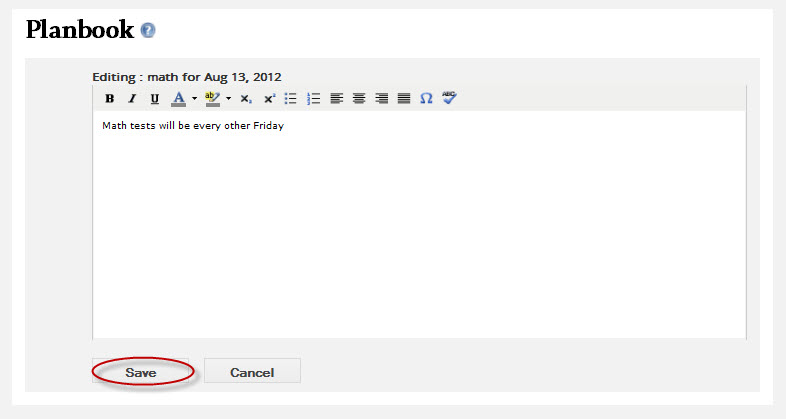
You can edit the information for this subject by clicking on the edit icon in the right corner.
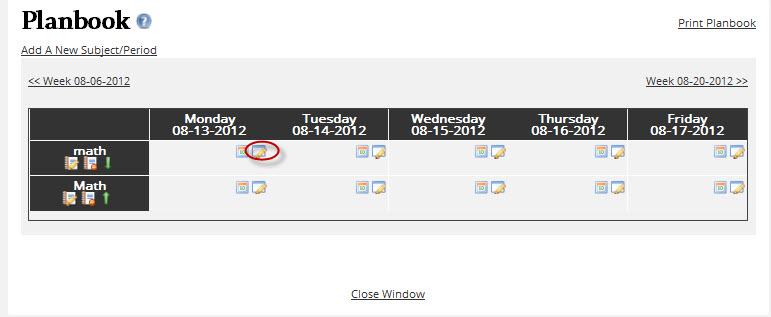
A new page will open where you can add your information. Be sure to click Save!
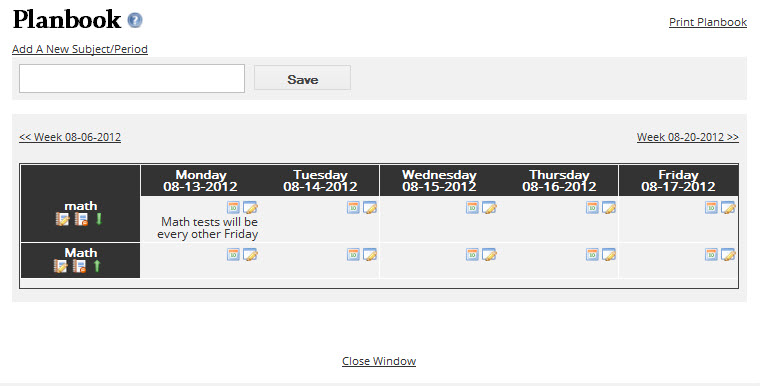
Once you have entered in your information, the planbook should look similar to this:
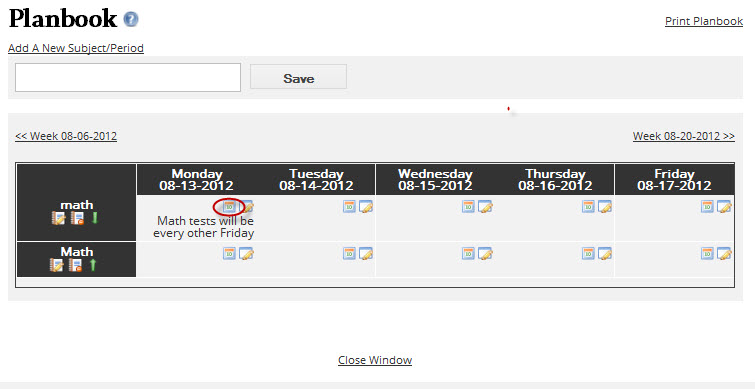
To add this information to your calendar, click on the calendar icon in the right corner.
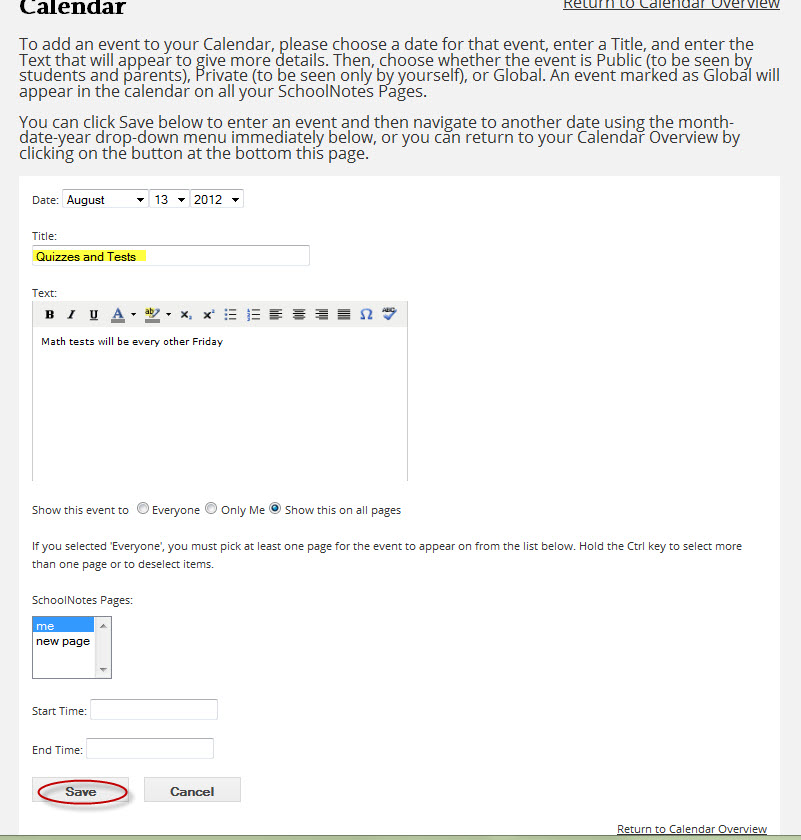
The Calendar: Add/Edit Event window will appear. Enter in the title for your information, click the pages that you want the information displayed on and then click Save.
Updating Your Browser
Is your current Browser version outdated? The following links will take you to the necessary site to update your browser.
To update to the most current version of Mozilla Firefox please click on the icon below:

To update to the most current version of Internet Explorer, please click the icon below:
![]()
To update to the most current version of Google, please click the icon below:
![]()
To update to the most current version of Safari, please click the icon below:
![]()
Upgrade to a Premium Account
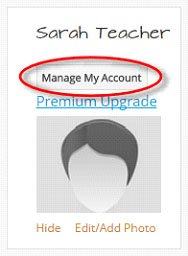
To upgrade to a Premium Account click on ‘Premium Upgrade’ located below the ‘Manage My Account’ button in your Profile desk:

Populate the Personal Information and Educational Focus Fields and select “Continue”:

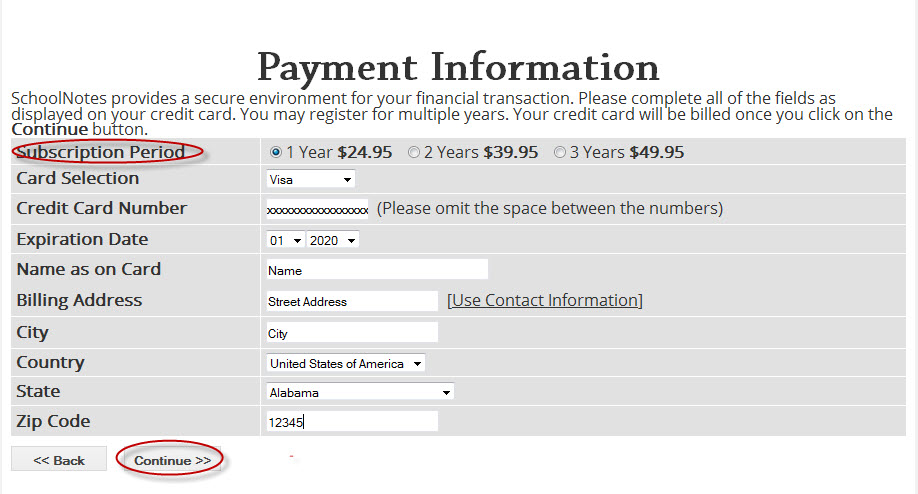
Next, select the length of your subscription and fill out the payment information and select “Continue:”
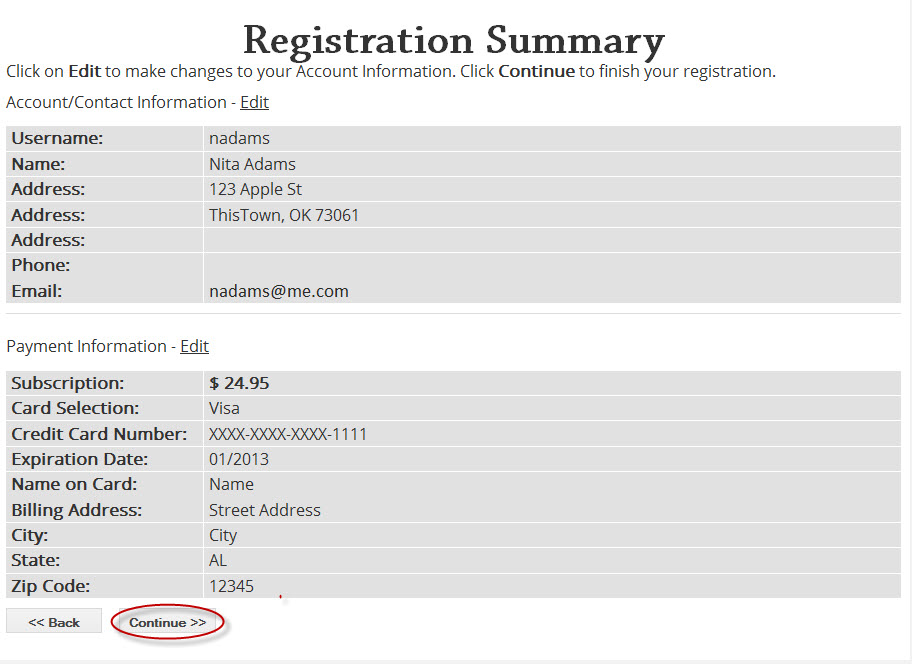
Review the information on the Registration Summary and select Continue:
You will then see a “Thank You” message.

Check your email account for your order confirmation and enjoy the benefits of Premium SchoolNotes!
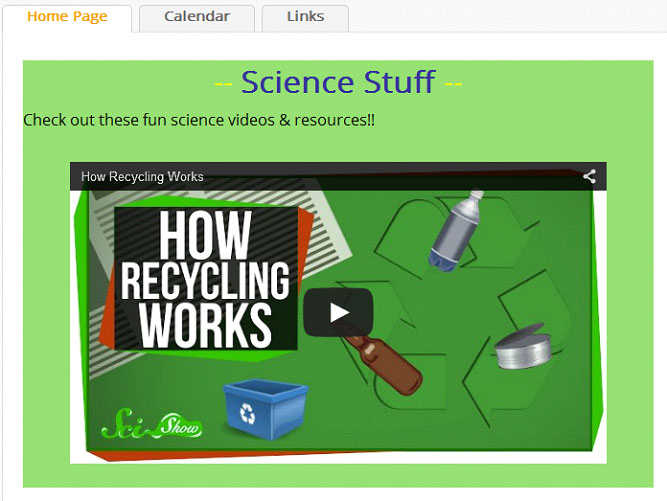
Working with Videos
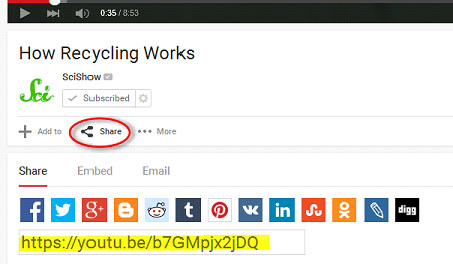
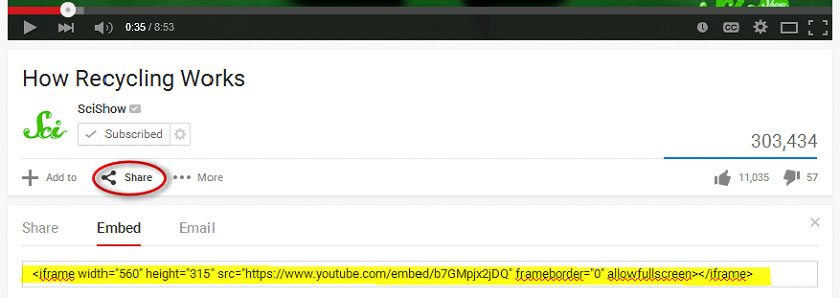
First, you will need to locate the video you would like to add to your SchoolNotes page. You’ve likely heard of YouTube.com but, there are plenty of other video sources on the web. You can even upload your own video files. *Please make sure you have permission to use any video first.*
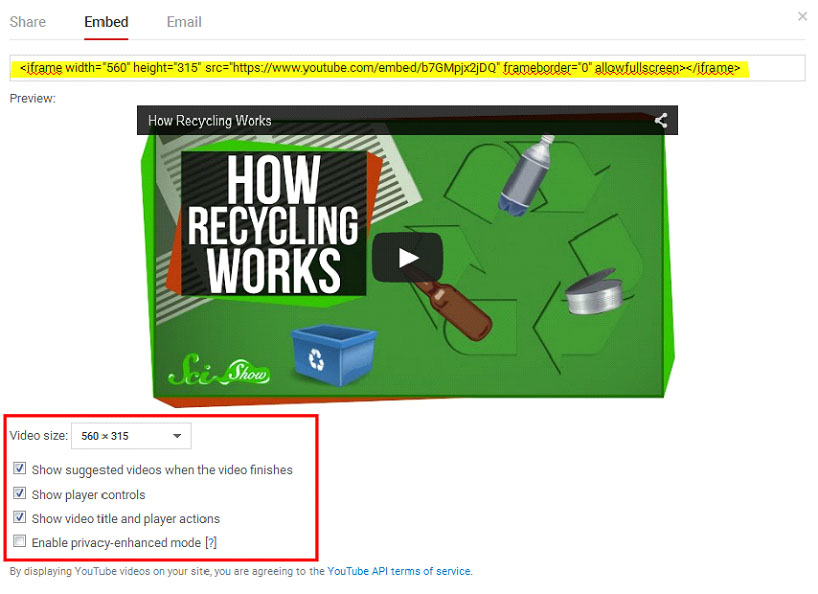
To add a video to your page you will need an <Embed> source code or a Share link. Most websites provide these when they post a video. On YouTube they are found below the video by clicking on ‘Share’:
Share Link:
Embed Code:
If you are using the embed code you can adjust the settings for the video- size, whether you want suggested videos to show once your video is over, etc. Once you have selected your video settings you can copy the updated ‘Embed Code’. This code is what will be pasted into the editor so your video will display on your page.
You can add the video either way; some sites may only provide one kind of source. Here are the steps for both.
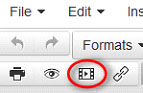
Log in to your SchoolNotes account and navigate to your “Pages” section and click the “Edit” icon for the page you want to put the video on. In the toolbar you will need to click the ‘Insert/Edit Video’ icon:
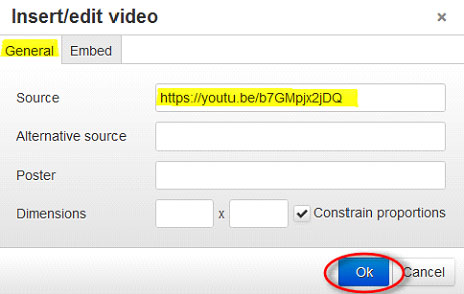
In the window that opens there are tabs to use both video source types to insert your chosen video.
If you are using the share link you will paste this in the ‘Source’ field on the ‘General’ tab, then click ‘Ok’:
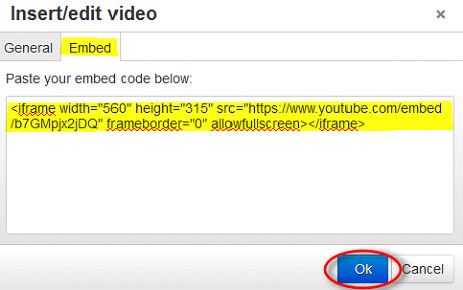
If you are using the embed code you will paste the code into the space provided on the ‘Embed’ tab, then click ‘Ok’:
You will now see your video file on your page. While still in ‘Edit’ mode it will appear as a gray box. The video won’t function until you are viewing your page from the public perspective.
You have the ability to adjust the size and location of the video on your page. You can do this by selecting the video box and using the standard click-and-drag method or, you can click on the ‘Insert/Edit Video’ symbol again and adjust the size that way.
If you are going to adjust the video though the video window I would recommend clicking the ‘Constrain proportions’ box, this will allow you to adjust one dimension and the other will automatically update to match the video’s current proportion. See the example below.
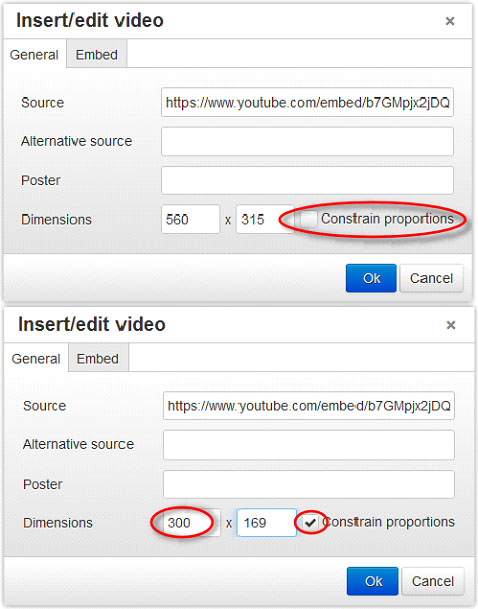
I adjusted the width (left dimension) to 300 and the editor automatically kept the video size proportionate. This is helpful if you would like to feature multiple videos on your page.
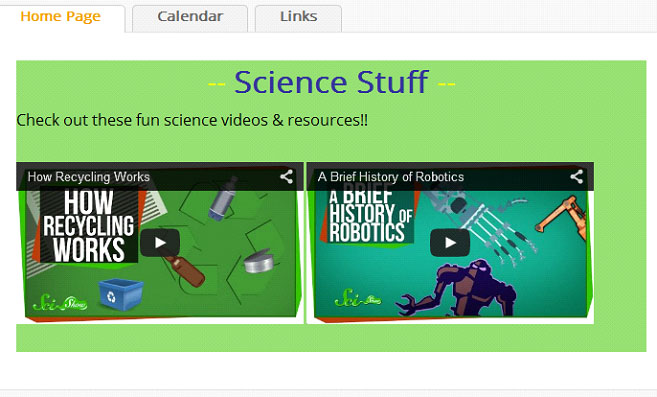
Follow the same process to add any additional videos to your pages.
You can also use a video of your own. Before you can insert the video you may need to convert it to the appropriate file type to gain the <EMBED> code. Prism video converter software is a popular site. Once you have the embed code, follow the steps above.
Working with the Calendar
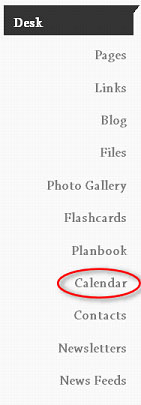
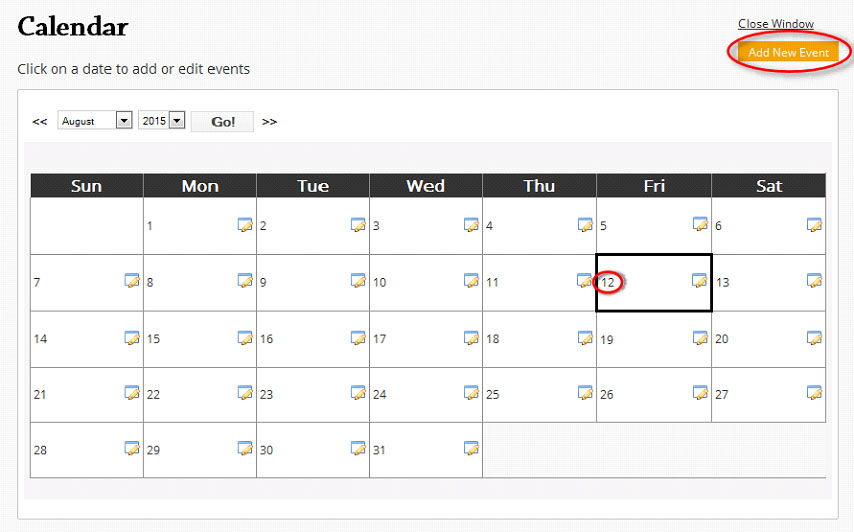
STEP 1: Once you have logged in to your account you will click on the Calendar link in the left margin:
*A new Calendar window will open so be sure you do not have a Pop-Up blocker program on your computer.
STEP 2: You can select a different month and year to enter an event by using the month and year drop down menu or by clicking on the forward/backward arrows. To add an event you can click the date or the ‘Add New Event’ button:
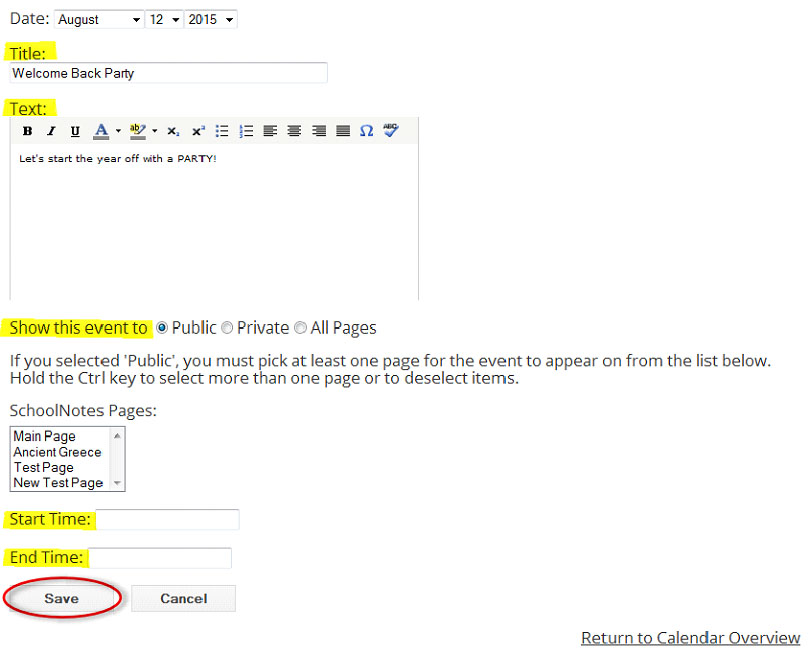
STEP 3: The window has now switched to Calendar: Add/Edit Event. Here, enter in the Title of the event you are posting for and then type in any information for that event under the “text” area. You will then select if you want this event to show to: Public/Private/All Pages
*If you select ‘Public’, you will need to be sure to select from the ‘SchoolNotes Pages’ box which of your pages you want this event to show on. (Hold the Ctrl key to select more than one page or to deselect pages.)
*If you select ‘Private’, the event will only appear for you to see.
*If you select ‘All Pages’, this event will appear on the calendar for all of your SchoolNotes pages.
You can also select a start/stop time for the event to let your parents and students know when the event is happening.
STEP 4: After you have completed your selections click on the Save button:
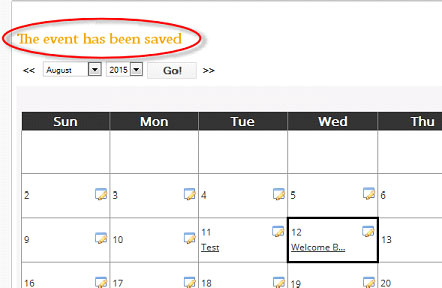
You will then see a confirmation that your event has been saved.
Premium Users can also add events to your calendar from your planbook. To do this, open up the planbook and select the Calendar icon.
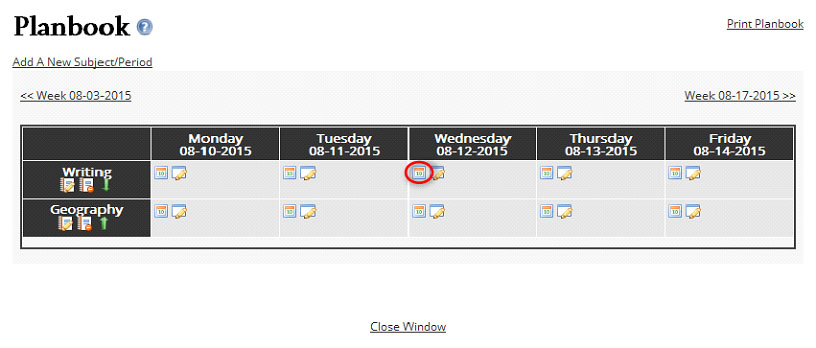
The calendar will open up and automatically populate the text area with the information that is in your planbook. You will then need to add a title, select "Show this event to" option, select the page, hit "Save" and you are all set!
You should see your future events appear on your teacher desk under "Calendar Events"